Pages

Friday, March 30, 2012

Easter Egg Hunt - Wreath Tutorial

I see a lot of crafty blogs doing wreaths for holidays and Michael’s has a humungous DIY wreath section – so I figured I must be missing out on something because I’ve never made one.   What fun I had – I’ve been missing a whole area of crafting!   I made a festive Easter egg wreath for the upcoming Easter Egg Hunt on Saturday.


Here’s what you will need:

·         Foam wreath
·         Burlap
·         May Arts Ribbon in baby blue, yellow, orange
·         Other ribbon in pink
·         Plastic easter eggs
·         Hot glue gun


Cover the wreath in burlap first.   Wrap the ribbon in sections after.   Glue the first part and the last part for a secure fit.


Glue a row of eggs together.  I also created a “flower” with the eggs.    Start by adding glue to one egg, then position the next.  Go all the way around in a circle with five eggs, then top with a sixth egg.   Add both egg components to the wreath. 


I love how bright and cheery this is.   I made some notes to improve for the next holiday or occasion, can’t wait to get into wreath making.   The 2nd Annual Easter Egg Hunt that we host is this weekend, I can hardly wait.   Be sure to check in Sunday for a photo recap, and all next week I’ll be sharing tutorials on cupcake toppers, decorations, favors, baskets, banners and more!  Have a great weekend.


I was so proud of this, I linked it up at a few blogging parties on the web.  Check out all these great sites.

·         Creating Really Awesome Free Things - http://creatingreallyawesomefreethings.com/
·         Weekend Warrior Party – Ask Anna Mosley - http://www.askannamoseley.com/
·         The Girl Creative - http://www.thegirlcreative.com/
·         Skip to My Lou - www.­skiptomylou.­org
·         Mad In Crafts – Mad Skills Monday - http://www.madincrafts.com/
·         Tip Junkie Inspire me Tuesday -  http://www.tipjunkie.com/category/handmade-projects/
·         Sugarbee Crafts – Take a look Tuesdays - http://www.sugarbeecrafts.com/
·         Handmade Tuesdays – Ladybug Blessings - http://ladybug-blessings.com/
·         Reasons to Skip the Housework - http://www.reasonstoskipthehousework.com/
·         Get Your Craft On on Today's Creative Blog
·         Show and Tell with Blue Cricket Designs -  http://www.bluecricketdesign.net
·         Wicked Awesome Wednesday -  Handy Man, Craft Woman - http://www.handymancraftywoman.com/
·         My Girlish Whims - http://www.mygirlishwhims.blogspot.com/
·         Linkin’ with Little Luna – Wednesdays Link Party -  http://lilluna.com/
·         Polka Dots Parade – Wow me Wednesdays - http://polkadotsonparade.blogspot.com/
·         Whatever Goes Wednesday on Someday Crafts.

·         House of Hepworths - http://www.houseofhepworths.com/


Thursday, March 29, 2012

Pickled Peppers

I love getting a hostess gift that came straight from someone’s garden.   My friend Ginnie Martin is great about this.  She has a tremendous garden in their home in Blue Ridge, GA and makes homemade pepper jelly a few times a year.    I tried it first when my goddaughter Ella was born and I came over Ashley's one night for a visit.   The pepper jelly was spread over a block of cream cheese, and served with Wheat Thins.   Trust me if you haven’t had it before – it’s to die for!   You can tell I am pregnant because I am blogging about how delicious this pepper jelly is.    Aren’t my goddaughter’s cute?   They're pictured here with their grandmother and my friend Ginnie.  


Angie Holden has a recipe for Pickled Peppers from her garden and packaged them up to give as a hostess gift.    Make a bunch of these a few times a year and store them in your pantry – then you aren’t rushing to find a bottle of wine or to Hallmark for a nick-nack right before you head out the door.   Angie stamped using her personalized PSA Essentials stamp that says – “From Angie’s Kitchen” onto a gift tag.  Then she added “Pickled Peppers” at the bottom to identify the contents. 


Here’s the recipe, should you choose to make Pickled Peppers.    Don’t they look delicious?

Ingredients
·         1 1/2 pounds banana peppers, cut into 1 inch pieces
·         1 pound jalapeno peppers, cut into 1 inch pieces
·         1/4 pound serrano peppers, cut into 1 inch pieces
·         6 cups vinegar
·         2 cups water
·         3 cloves garlic, crushed
·         1 onion, chopped

Directions
1.       Place the banana peppers, jalapeno peppers, and serrano peppers into a large pot. Add the vinegar, water, garlic, and onion. Bring to a boil, then reduce heat to medium-low, and simmer for 5 minutes.
2.       Ladle peppers into sterile jars, and fill to the top with the liquid, leaving 1/4 inch headspace. Tap jars on the counter to remove air bubbles. Place two piece lids on the jars.
3.       Place jars in the rack of a large, canning pan, and fill with enough water to cover the jars completely. Bring to a boil, and boil for 10 to 15 minutes. Refrigerate jars after opening.

What do you typically bring as a hostess gift? 

Wednesday, March 28, 2012

Happy Birthday Cards

You always need a good birthday card – it seems like every week I have a friend or family member’s birthday to celebrate.   When you are feeling crafty and have some time, jump into your craft space and create a whole bunch of them.    Then store the handmade birthday cards in your desk so they’re ready when you need to send one out or bring to a party.   That way you aren’t creating them last minute.   Our design team member Regina Mangum has some ideas to inspire us when creating!

Here she used the cupcake from PSA Cupcake and the sentiment “Skip the cake and eat the icing” from PSA Dare to Dream.   I also spy the UBU girl holding a balloon from UBU Girls Got Game.    She used three of our stamp packs in one card!    The lime and pink are a great color combination and she made everything come to life by coloring things up with her markers. 


Up next, she used the dog from PSA Little Bunny.   I love the colorful polka dots and the twine from The Twinery here.   This is happy card, isn’t it?


Next she used all 9 of our cupcakes from PSA Whimsy Cakes.  She “decorated” each cupcake with her markers.   These stamps really are the focus of your attention on this card. 


Do you love these cards and want to create them at home?   Here are all the supplies she used so you can get started.  Happy card making!

Skip the Cake Card
Stamps: girl from Dress Up set, sentiment from Dare to Dream set, cupcake from Cupcake set (PSA Essentials)
Ink: Memento Tuxedo Black (Tsukineko)
Coloring Medium: Sketch Markers (Copic)
Cardstock: Blushing Bride (Stampin' Up!), Solar White (Neenah), green textured (Bazzil)
Patterned Paper: Happier (My Mind's Eye)
Accents: Glossy Accents (Ranger)
And Many More Card
Stamps: Whimsy Cakes (PSA Essentials), sentiment from Birthday Bash Sentiments (Papertrey Ink)
Ink: Memento Rich Cocoa (Tsukineko)
Coloring Medium: Sketch Markers (Copic)
Cardstock: Solar White (Neenah), Blushing Bride, Chocolate Chip (Stampin' Up!)
Fibers: Pink/Brown Stitched Grosgrain (Jo-Ann)
Accents: Diamond Stickles (Ranger)

Big Birthday Card
Stamps: dog from Little Bunny set (PSA Essentials), sentiment from Birthday Bash Sentiments (Papertrey Ink)
Ink: Memento Tuxedo Black (Tsukineko)
Coloring Medium: Black Multi-liner (Copic)
Cardstock: Solar White (Neenah), Real Red (Stampin' Up!)
Patterned Paper: Sole Sisters (Imaginisce)
Fibers: Maraschino Baker's Twine (The Twinery) 

Tuesday, March 27, 2012

Gender Neutral Baby Cards

One of the reasons I like not knowing 2.0’s gender is because I am not a big fan of baby blue or pink colors and you tend to get inundated with when you know.  So I love it when interior designs, clothing, and paper crafts are able to welcome baby in a gender neutral way.   Melissa Connolly created these cards fitting for either a boy or a girl.   They’re perfect.

Melyssa stamped the elephant from PSA Little Bunny Peel & Stick here.  She not only colored him up, but shaded him to give him depth and dimension.   I love the heart tag she framed him (or her) in.   The tile work of the patterned paper is graphic and bold, but the ribbon keeps this card soft. 


Melyssa has a talent for creating a suite of cards – they’re different but alike at the same time.    This time is no exception.  Here she stamped the dog from PSA Little Bunny and framed him in a start tag.   The papers are greens and yellows instead of beige.  


Little Bunny is my favorite Peel & Stick set to welcome baby.   PSA Carriage is also great! The design possibilities are endless here and they’re all adorable.   You can get 30% off this set at Cyber Savvy Shop right now if you are interested. Head over there now


Do you find it a challenge to give a gift or card when you don’t know the gender of a baby?  These two ideas are sure to help next time you are making a card.  

Monday, March 26, 2012

Easter Egg Garland - Kids Craft

With Easter just days away, Molly and I cooked up a quick and easy garland to dress up the mantel and make our house look festive.  This worked well with our St. Patty’s Day Shamrock garland, so I sought to replicate it.   I wasn’t as focused on the end result – just spending an hour doing this with her was a lot of fun.  She’s very proud of it and showed Mike as soon as he got home from work.

First, we started with a few crafty materials.


·         Elmer’s School Glue
·         Martha Stewart Bunny Punch
·         PSA Peel & Stick stamper loaded with espresso ink and easter egg from PSA Topiary
·         PSA Peel & Stick stamper loaded with plum purple ink and bunny from PSA Little Bunny
·         Glitter glue
·         A small hole punch (we used one with a star)
·         Fiskars scissors
·         The Twinery twine
·         Pastel cardstock

I first folded the paper in half, the cut out eggs.    With the remaining paper, I let Molly punch the bunnies out using the Martha Stewart bunny punch.


Then she glued the bunnies onto the eggs.


We stamped a few of the eggs, alternating between Little Bunny with plum purple ink and the easter egg from PSA Topiary with espresso ink.


We used some glitter glue, because really – gliter glue is way more exciting than regular school glue.


Time to punch the holes.


Threading the twine required a lot of assistance, but Molly also worked hard to do it herself.


All threaded up... 


 And ta-da!  Doesn't it look cute?  Most importantly.... it was fun! 


Friday, March 23, 2012

PSA Essentials/Basic Grey Blog Hop


Welcome to the PSA Essentials/Basic Grey Blog Hop!  We hope you have enjoyed today’s inspiration and if you are just starting out, be sure to visit these talented ladies blogs to see designs that use both of these great projects.   Be sure to enter our giveaway at the end of this post – you could win two of Basic Grey’s latest paper sets and Peel & Stick stamps from PSA.  

For those new us, we manufacture self-inking, personalized stamps.    These days a lot of our blogging and crafty friends are getting their names and blog address on a personalized stamp so they can stamp the backs of their handmade cards. 


There are a lot of uses for our personalized stamps.  Perfect for note cards, gifts, return addresses, personal stationery, recipe cards, books and so much more!  This blog is dedicated to all things crafty using our stamps.   Hope you join us each day as we share inspiration.


We have patent-pending Peel & Stick technology which allows you to switch out your personal stamp with thousands of stamps, from summery designs, Halloween, Christmas, Holiday, Valentine’s Day, baby, bridal, sentiments, Hello Kitty, Peanuts, Rudolph & more here:  http://www.psaessentials.com/peelandstick.htm . 

That’s why our PSA Essentials stamps are perfect for creating cards, scrapbook layouts, party favors, home décor, artwork, DIY projects, and so much more!  You can use them with the PSA Stamper to get crisp and clean impressions or with an acrylic block – they work just like any other clear stamp!  

Time to let you know about the Spring Sale at Cyber Savvy Shop – where you can buy PSA Essentials.  Get 30% off all Peel & Stick stamps and a custom stamp (normally $40) is on-sale for $26.50.   Head over there to check them out!


Now off to hop if you haven’t already!  Start at Basic Grey:  http://blog.basicgrey.com/

·         Basic Grey:  http://blog.basicgrey.com/
·         Mae Armstrong - http://maearmstrong.blogspot.com/
·         Angie Holden - http://www.thecountrychiccottage.net/
·         Vera Yates:  http://lingshappyplace.blogspot.com/
·         Jamie Cripps - http://jamielanedesigns.blogspot.com/
·         Jeanne Streiff - http://inkypaws.blogs.splitcoaststampers.com/
·         Jennifer Holmes:   http://www.simpleflourishes.com/
·         PSA Essentials:  http://www.psastampcamp.blogspot.com


Thursday, March 22, 2012

Command Center

In my nesting craze, I have a serious need for organization.  This fridge and desk in the kitchen were not cutting it.  Clutter kept piling up.  Admittedly it’s not a disaster, but it was still not up to par… this is what it looked like before:


I have been really wanting a “command center” and loved the Daily System from Pottery Barn.  (Even have a board dedicated to this idea on Pinterest - http://pinterest.com/libby_oregan/command-center/).   I used some gift cards from Christmas and purchased the white board, letter and pin board I wanted.  If you are doing the same, don’t forget to order the rods, too.  The “O” for “O’Regan” is from Restoration Hardware Baby.


I made magnets to jazz things up a little.   It took me 5 minutes and I was on the phone the whole time with my father.  So it was really easy!  Here’s what you need:


·         Colorful paper
·         PSA Essentials Peel & Stick stamps:  Date Night & Mom’s Calendar
·         Black ink & your PSA Essentials stamper
·         1” inch hole punch
·         Strong adhesive – like 3M photo mount
·         Magnets

Just stamp the images you want onto your paper, punch out and adhere to your magnets.  I didn’t finish off with a sealer, there’s no need.


They add some color to the calendar.


For my fridge, I ordered chalkboard stickers from Wallies.  I am using these to plan my weekly menu for our family and another to keep track of what we need at the store.


The result of my organization is a few dollars less in the bank, a little bit more organization and total peace of mind for the preggo lady.


Happy organizing!  I was so proud of this project, I posted it to linking parties on my favorite blogs.  Ever done a linking party?  They are so fun.   Check out these amazing blogs and come join the party.


Wednesday, March 21, 2012

Modern Art

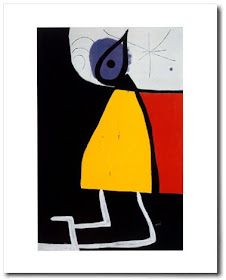
My parents are modern art collectors, so I grew up with an appreciation for modern art and works by Miro, Boisrond, Haring, Matta, and Britto on our walls.


I am a big fan of Romero Britto and in 2009, my parents generously and fittingly gave us this to start our own collection:


When it comes to modern art, some people don’t “get it,” as if it’s much easier to understand a painting of ballerinas by Degas.  That seems to make more sense than a bunch of circles, squares and lines that are seemingly randomly placed on a page.    Art is subjective to the person viewing it.   Art just has to make you feel something to be successful:  a jolt of sadness, a twinge of happiness, a surge of excitement.   The pieces that give you the strongest reaction – those are the ones I judge as best.   If you really hate a piece of modern art, I deem it successful - it moved you to "hate" something and evoked your emotion.  Art is a real passion of mine, I miss the days of art history, crits and studio time. 

Jeanne Streiff worked on some modern art cards for a publication call this past month.   This card plays with geometric shapes and patterns and inspired me to write this post about modern art.  She’s used the Hello Kitty stamp from Hello Kitty Garden Club and colored her up using her Twin Touch markers.


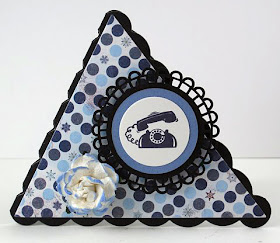
This triangle shaped, “Call me” card also plays with patterns and shapes.   The telephone is stamped from PSA Cupcake. 


What’s going on in the art world now?  Stay connected and scope things out with my favorite art magazine Blue Canvas. http://www.bluecanvas.com/magazine


 Online you can see current artists who upload their work to galleries, a community that votes on their favorites, and work that gets published and sold in galleries.   It’s a great way to stay current with today’s art world.   It’s a wild one!