Pages

Monday, April 30, 2012

DIY Canvas Book Bag & Tag

Mae Armstrong takes her twin boys Ryan and Will to the library often to check out new books.  Your public library is a GREAT place for kids, and such a wonderful habit to get into when you are young. Keeping books fresh for kids is important so they are constantly exploring new subjects and topics, and developing new interests.   Reading the same books over and over again is also good for vocabulary and speech development – so when I find a book at the library Molly is really interested in, I always head to the bookstore to add it to our collection.

Mae created a canvas bag and tag for Ryan and Will to carry their books back and forth.    Today she’s sharing this awesome tutorial!


Mae used an old promotional canvas bag from an event she attended years ago.  First, fold bag lengthwise and start using the bag as your pattern. Don't worry about the weird bottom. Eyeball the length of the bottom and cut the fabric. Prepare four sets of fabric. This is a reversible bag so you just need matching fabrics.


Line the right side of the fabric and sew along the side. Fabric design facing each other.


Sew the top seem of the bag.


Sew all sides after finishing the top seam and measure 3' for the bag fold. 


Trim the extra triangle end pieces.


Prepare two sets of the body. Turn the 2nd body inside out. This will be the interior of the bag. Line up the top openings and insert cotton belting handles in between the top portion of the bag. Pin all edges and sew bottom first and sew around at the top.


Now you will want to create a great tag to go with the bag.    Measure 3"x5" for the printed fabric and use a plain fabric for the top of the plastic cover.


Iron the fabric, fold and sew the plastic cover in between the bias tape.  Mae used an old plastic folder and cut it down to size.


Prepare an extra strip of fabric for the strap and sew it down to 1/2". Insert the straps inside the printed fabric and add the plastic cover on top. Align the bottom of the plastic to line up against the printed fabric. Sew all three sides and trim extra fabric or plastic.   Mae didn't sew the fabric inside out. The plastic cover is sturdy and if you try to turn the fabric right side out, the plastic won't stay flat.  Don’t mind the rustic edge. I think it brings a little character. If you're concerned about fraying you can buy Dritz Fray Check at any craft supply store.


For the card stock insert, Mae decorated the paper with PSA Essentials Peel and Stick stamp using the UBU Beach set.  She also stamped the names on the card. The extra two lines will be dedicated for the home address.


Here's the finished bag with the fabric tag.


Here is Mae’s latest stash nicely tucked inside our lovely bag.


Happy crafting and reading!

Saturday, April 28, 2012

2nd Baby Party

In the last 4 years, I have had an engagement party, two bridal showers, two bachelorette parties, a wedding, and a baby shower.   My oldest friends have generously given me a gift for each occasion, and I suspect if I really tallied it all up, there are a few friends who’ve spent thousands (really thousands!) on all things Libby O celebration related.   When the question came to throw a shower for Baby 2.0 came up, I said enough is enough.    Where I come from you get one baby shower.   By the time the second baby comes, you should really have everything you need and it looks greedy to ask your friends and family to bring you yet another present.   Do you really want to “ooh and ahh” again for a stroller or a onesie anyway?

My very good friend Susan is a 2nd child and insisted that “2nd children deserve a party, too!”  So I came around to the idea of a party so long as guests were asked not to bring gifts and the focus was just on celebrating the baby.   On Sunday, April 22nd, Susan and my mom hosted a beautiful brunch.  I feel incredibly lucky to have such wonderful friends and I am so thankful I have for the time with them, and to my mom and Susan for making this happen.  


You may recognize Susan’s name – she’s a member of our design team and is super crafty.  She had a PSA Stamp made for the party that reads “2nd Children Deserve A Party, Too! Baby 2.0.”  She had blue cards and girl cards stamped, guests were instructed to guess the gender of the baby and also write him or her a note.


She spent weeks preparing for this party by making different decorations.  She hand-died white onesies to match the color scheme, then hung them from a rope with clothes pins on the mantel and on the staircase.


She sewed colorful felt together in a line to create festive banners for the staircase and from the light fixtures.  The fresh flowers were simply gorgeous – an array of different colors and types.  And I love her diaper cakes all over the place.


Susan and my mom thought of every detail – the champagne bottles (not for me) and the Perrier bottles (for me!) were decorated with the stamp (using pink & poppy ink) too.


My mother did an amazing job with the food.   We feasted on homemade vegetable quiche (where the main ingredient called for at least 6 different grocery store stops before it was found!), cut fruit, shrimp cocktail, veggies, cinnamon rolls and pastries from our favorite, Ronnie’s Bakery.


For dessert, my mom baked a carrot cake with cream cheese frosting (pretty much the best thing I’ve ever tasted) and decorated it with “2.0” in raspberries. 


The best part of the whole party – in addition to the decorations and the food – was the company.   I truly love my friends! It was special to be with them without our kids all running around, and really have quality girl time. 


In the end, the universal truth is that all babies deserve to be welcomed into the world with a celebration.   Whatever you call it – baby shower, sprinkle, blessingway, mom-party, welcoming or baby naming, celebrating a new life is important.   Thanks to my mom and Susan for holding such a beautiful event – Baby 2.0 will surely appreciate it.   I know I really did.  


Friday, April 27, 2012

Stamps for Brides


I hope you have enjoyed all the great inspiration this week at our bridal week!  Today we are sharing our most basic function of our stamps... addressing envelopes!

You can literally save hundreds of dollars on printing with a personalized stamp.   Use it for save the date cards, shower invites, wedding invites, and all of your thank you notes during your wedding.  Etiquette would dictate that you should not use your married monogram yet, or send from your married last name (since you are not married yet).   However, what about using your first names?


Or just choose from any of our wedding themed stamps as your center and skip names all together!  For the save the date, use the save the date stamp from PSA Bouquet Toss.   For the wedding, use the wedding cake from Love Birds.  


You can add a pop of color to your invitations, too.   Choose from any of our 22-ink colors, we are sure to have one that coordinates with the wedding colors.  


WANT THEM?  Right now, you can get a personalized stamp for just $26.50 at Cyber Savvy Shop (normally $40!)  Plus now through May 1st, you can get a free Rosetta Peel & Stick pack with your custom stamp purchase.   Peel & Stick packs are just $11.25 (normally $15).    Head on over!

Congrats on your wedding if you are planning one!  And remember, they also make great gifts for the married couple and their new last name!


Thursday, April 26, 2012

Color Inspiration for Weddings


This week our focus has been on wedding planning and we’ve provided some inspiration and shared some expert tips.   A common piece of advice?  Coordinating  around a color palate or theme is key to a beautiful event.   Today we’re “planning a wedding” around the color purple.  A great color this spring.    I’m loving this mood board from Snippet and Ink.  Kathryn calls it a “purple picnic wedding.”   


Jeanne Streiff created a stationery suite using the color purple.   For the event invite, she stamped the wedding bells from PSA Mr. & Mrs.  Peel & Stick stamps. She used a textured cardstock and 3-D paper purple flowers. 


For the thank-you card, she’s stamped the dress from PSA Mr. & Mrs. Peel & Stick stamps.   It coordinates perfectly with the invite.


She created a table place card that goes with the suite, too.   The bouquet is stamped from PSA Mr.& Mrs. Peel & Stick stamps.  This is such a great set for bridal. 

If I were planning a wedding with this stationery suite and this inspiration board, I might choose this event lighting.

Image Source - Kristen Spencer Photography

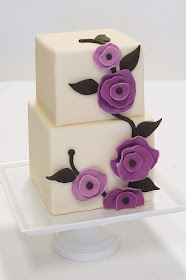
I might choose this for my cake.

Image source: via Pinterest (source unknown)

And I might choose these as my centerpieces.   What a beautiful explosion of color!   
.

Image source

Whatever you do when you are planning a wedding or event, be sure to start with inspiration first.   Choose images that make you happy and set the tone for what you envision.  Then go from there!  I hope you have enjoyed this week of bridal inspiration, have a great weekend!

Wednesday, April 25, 2012

Bridal Trends for Spring 2012


Yesterday I introduced you to Amanda Spencer, owner of Spencer Special Events.   If you missed the post, be sure to read it and check out some great money saving tips and excellent wedding planning advice.  

I was curious to find out what trends she was spotting this spring 2012.  “I am loving the soft romantic colors and natural elements in design,” Amanda said.  “Fresh, simple, and clean are some of the key words this spring.” Snippet and Ink had a great inspiration board that matched Amanda’s key words and description.   I love the natural elements here – the wedding on the beach, the sand dollars, and the simple and clean white flower arrangements. 


Jamie Cripps was also thinking of this beautiful color palate and natural design when she created a wedding stationery suite.  For her friends Craig & Janie, she created an invitation that opens up and has a pouch inside for a response card, directions and information.  Jamie used the “C” and “J” from PSA Gigi Monograms, and the flowers are stamped from PSA Rosetta Peel & Stick stamps.   She colored the flowers up with her markers to give them some dimension and coordinate with the ribbon and cardstock. 


I love the thank-you card with pre-printed message:  “We thank our family and friends for celebrating in our joy, supporting us, and sharing in our love.”  Then there is room for a personalized note, too.  
She carried the theme all the way through – right down to the table place cards.  


For a destination wedding, Amanda recommends a welcome bag.  “Wedding guests love nothing more than after traveling to arrive on location to a goodie bag filled with fun items hand-picked by the bride and groom.  Local favorites are always fun.”   For around here, that means ideas like Hilton Head Popcorn Company, lighthouse shaped sugar cookies, Heritage shortbread cookies, a Savannah praline, Pluff southern iced tea, or even a bottle of Palmetto Pale Ale.

Spencer Special Events has also had a lot of fun with the bag itself.  “We have used lovely beach bags, insulated cooler bags (which come in quite handy on the golf course or beach), or a simple brown craft bag tied with a darling tag.”   Here are some cool ideas I found for welcome bags.


Buy Here 


Buy Here  


Stay tuned for more inspiration and tips tomorrow! 

Tuesday, April 24, 2012

Wedding Planning Tips


A friend of mine just so happens to be the owner of Spencer Special Events and while writing Bridal Week at PSA Stamp Camp, I consulted with Amanda for her expertise and advice for wedding planning tips.   Amanda got her Bachelors of Science in Hospitality Tourism Management from Purdue University, was the Event Manager for the Kentucky Chamber of Commerce, and opened her own business planning weddings and other social events in Bluffton, SC in 2005.  So for this week, she’s my expert.    Amanda is incredibly enthusiastic about her job and adores working with brides and grooms planning their weddings in the Low Country.   Here is Amanda with her husband, Case.   Aren’t they cute?!


I asked Amanda, what’s the first step in planning a wedding?  “My first advice is to enjoy the engagement!  This is such an exciting time for them along with their friends and family and it all goes by so fast.  So I tell them to breath, relax and enjoy the ride.”   But when it’s time to get down to business, first decide what type of wedding you’d like.  “Be it destination, formal, church ceremony, plated dinner, casual, beach ceremony, stations… what do you envision?” says Amanda.   After that comes to a few hard questions.   What can you spend, who’s paying for what, and how many people are you able to invite?  These answers will help find the perfect location and get the ball rolling for your big day.   

I wanted to know more about invitations, since my favorite part of planning parties and events are the invitations and stationery suite.  I asked Amanda if engraved invitations are really worth the money.  “Engraved invites are not a must,” says Amanda. “This is a great place for you to keep your costs low.  Just as everything wedding related, your stationary suite is a great way to show your personality and what type of treat your guests are in for.  But this does not have to break the bank!”

Our design team member Regina Mangum came up with some wedding stationery suite ideas.  This elegant ensemble did not break the bank. 


For the invitation, she created a word document with all the information, printed it on cardstock and adhered to a green border.   She fixed that to a larger piece of textured cardstock.  She stamped the bee from PSA Topiary Peel & Stick stamps onto a pre-printed tag, cut two holes and threaded them with ribbon.    The invitation sets the stage for a formal event, possibly held outdoors, by nature lovers or people who enjoy being outside.


Each piece coordinates beautifully, including the table markers, bottles of wine, and favors for the guests to take home.


Speaking of favors, I asked Amanda what the coolest favors she’s seen or done lately.   “This past weekend the bride and groom gave custom M&Ms that reflected all of their printed materials, wedding date, custom monogram, and live oak tree.  A couple of weeks ago, the bride loved salty and the groom loved sweet so we packaged in simple brown bags Cape Cod potato chips and a  box of See's chocolates both near and dear to the couple's heart.  We have even given an ice cold coca cola with a McDonald's cheeseburger which was much loved by a drinking crowd.  As another lovely option, we have mailed "thank you boxes" to all wedding guests the Monday after the Big Day! They were filled with Lowcountry Luxe candles, sweet grass baskets, lemon bar mixes, and a handwritten note from the bride and groom thanking them for joining them on their special day.”

My other favorite Amanda tip?   Don’t stress about the guest list.  She says, “As excited as you are to share with EVERYONE you are marrying the man of your dreams, it is truly OK not to invite everyone that you once worked with or your grocery bagger from Publix.  Folks will completely understand and love seeing your pictures and hearing all about your happiness! I feel like couples sometimes have too much pressure on who they should and shouldn't invite.  Remember this is your day!”

More inspiration and tips tomorrow.  See you then!