Pages

Thursday, May 31, 2012

Graduation Card


Melyssa Connolly’s Congratulations to the Graduate card makes my Top 15 Super Star Cards because of its amazing layered style.  


Why it works:  Patterns, colors, and layers – Melyssa is not afraid to go all out and pack it on there.   And it all works! She’s stitched into her card, like she does with so many of her cards and that I find so impressive.   What attention to detail!  The Hello Kitty graduate stamp from Hello Kitty School Days is perfect for any graduate. 

In reviewing all the cards for Super Star Cards, I can across over a dozen of Melyssa’s cards that I absolutely love.   Take a peek at all of them that made my favorites, I couldn’t settle on one and I only had 15 spots.    Which is your favorite of these?


Want to win Peel & Stick packs?   If you’re inspired by this card, recreate it exactly or do a variation.   Upload it to our Facebook page!  Each time you share a card on our Facebook timeline, you’ll earn one entry to win 3 PSA Essentials Peel & Stick packs of your choice.   We’ll choose just one winner from all the entries so good luck and happy card making!

Wednesday, May 30, 2012

Just because card


This card by Jennifer Holmes makes my Top 15 Super Star Cards – out of the thousands we have to choose from – because quite simply, it makes me happy. 


Why it works:  The bright card stock is sure to pop out of any mailbox.  The three sunglasses stamped from PSA Life’s A Beach are colored up and beachy.   I love the rectangular scalloped die cut paper that frames the row of glasses.   The colors all work together!

What you’ll need:
·         Stamps:  Life’s a Beach Peel & Stick Pack (PSA Essentials), Fillable Frames #5 (Papertrey Ink)
·         Paper: Stamper’s Select White, Lemon Tart and Raspberry Fizz (Papertrey Ink)
·         Ink:  Black Tuxedo Memento (Tsukineko)
·         Tools: Long classic and scalloped rectangle dies (Spellbinders), adhesive rhinestones (KaiserCrafts)
·         Other:  foam dimensionals, twine (The Twinery), markers (Copic)

How to recreate it:
  1. Cut card base from yellow cardstock (6x6).
  2. Cut long rectangle from white cardstock using die.
  3. Cut slightly larger scalloped rectangle from raspberry cardstock using die.
  4. Stamp sunglasses onto white cardstock and stamp sentiment underneath.
  5. Color sunglasses with markers and add rhinestones to corners.
  6. Tie twine around front of card and tie a bow.
  7. Adhere white cardstock and raspberry cardstock together and adhere to front of card with foam dimensionals.

Want to win Peel & Stick packs?   If you’re inspired by this card, recreate it exactly or do a variation.   Upload it to our Facebook page!  Each time you share a card on our Facebook timeline, you’ll earn one entry to win 3 PSA Essentials Peel & Stick packs of your choice.   We’ll choose just one winner from all the entries so good luck and happy card making!

Tuesday, May 29, 2012

1st Birthday Girl Card


I love the Pampers commercial with slogan, “You’ll have a child forever, but a baby for just a year.”  So true!  It seemed like Molly changed almost instantly into a toddler at 12months.   Celebrating turning one is a huge milestone.   This card by Jennifer Holmes celebrates it beautifully and therefore makes my Top 15 Super Star Cards.


Why it works:  The elephant from PSA Little Bunny combined with the cut out of the baby onesie is appropriate for a baby’s 1st birthday.   Natural paper, grey, pink and cream colors work beautifully together.    I love the dimension Jennifer has achieved with the onesie, the “1” stamp from PSA Vanilla framed in a scalloped die cut, felt scalloped trim, and the ribbon.    It’s interesting and beautiful!  

What you’ll need:
·         Stamps:  Little Bunny and Vanilla 10 Peel & Stick Packs (PSA Essentials), Bitty Baby Blessings (Papertrey Ink)
·         Paper: Kraft, Vintage Cream, Lavender Moon (Papertrey Ink), cream (Bazzil Basics)
·         Tools: circle punch (Stampin’ Up!), classic scalloped circle die (Spellbinders), perforating tool (Memory Makers), medium scalloped border die (Papertrey Ink), Silhouette Digital Cutter
·         Other: Vintage Cream wool felt, Lavender Moon swiss dot ribbon, Harvest Gold vintage button (Papertrey Ink), Copic marker, foam mounting tape

How to recreate it:
  1. Randomly stamp elephant image all over card base and color with Copic marker.
  2. Die cut scalloped border out of wool felt and adhere to bottom of card.
  3. Tie ribbon around card, making a bow.  Add button to center.
  4. Die cut onesie image using Silhouette digital cutter or other die cutting machine.
  5. Using perforating tool, create stitch lines around onesie.
  6. Stamp elephant image onto front of card and color with Copic marker.
  7. Stamp sentiment under elephant image.
  8. Adhere onesie to card using foam mounting tape.
  9. Die cut scalloped circle from lavender cardstock. 
  10. Stamp number “1” onto cream cardstock, punch out with circle punch and adhere to scalloped circle. Adhere this to the front of card.
Want to win Peel & Stick packs?   If you’re inspired by this card, recreate it exactly or do a variation.   Upload it to our Facebook page!  Each time you share a card on our Facebook timeline, you’ll earn one entry to win 3 PSA Essentials Peel & Stick packs of your choice.   We’ll choose just one winner from all the entries so good luck and happy card making!

Monday, May 28, 2012

Baby Card


This baby card by Kelley Eubanks makes my Top 15 Super Star Cards because it truly breaks the mold!


Why it works:  Let’s break out of the rectangle or square a little!  As every new parent knows, the onesie is an essential part of a newborns wardrobe.  So it’s only fitting that a card should echo that.   I love the different color inks that she’s stamped “j-o-y” with using PSA Vanilla Peel & Stick stamps.  The white background is the perfect setting for those colors and stamps to pop out.
 
What you’ll need:
·         Stamps - Vanilla JR and Vanilla SZ by PSA Essentials
·         Paper - White by Papertrey
·         Ink - Real Red, Tangerine Tango and Daffodil Delight by Stampin' Up!, Chamomille Tea Dye by Papertrey Ink
·         Other - Baby Onesie Template by Paper Smooches, Kaiser and Doodlebug Jewels

How to recreate it:
1.       Print and cut template
2.       Ink edges
3.       Stamp letters
4.       Adhere jewels

Want to win Peel & Stick packs?   If you’re inspired by this card, recreate it exactly or do a variation.   Upload it to our Facebook page!  Each time you share a card on our Facebook timeline, you’ll earn one entry to win 3 PSA Essentials Peel & Stick packs of your choice.   We’ll choose just one winner from all the entries so good luck and happy card making!

Friday, May 25, 2012

Mr. & Mrs. Wedding Card


With so many people giving cash or check in lieu of a boxed gift to the bride and groom, the card in which you place dinero is increasingly more important.   I love this Mr. & Mrs. card for that purpose by Jeanne Streiff.  See why it makes my Top 15 Super Star Cards of all time at PSA Stamp Camp. 


Why it works:   The wedding dress and tuxedo stamps all lined up are adorable! I love the “Mr. & Mrs.” stamp, too.   When you are first married, it’s so exciting to be “Mr. & Mrs.” All these stamps can be found on PSA Mr. & Mrs. Peel & Stick stamp pack.  I love the black, white, and purple and the perfectly matching ribbon (tied perfectly!) to cardstock.  CardMaker magazine also thought this was a Super Star card and published it in the May 2012 issue.

To recreate it, you’ll need to buy the May 2012 issue of CardMaker magazine and find out!

Want to win Peel & Stick packs?   If you’re inspired by this card, recreate it exactly or do a variation.   Upload it to our Facebook page!  Each time you share a card on our Facebook timeline, you’ll earn one entry to win 3 PSA Essentials Peel & Stick packs of your choice.   We’ll choose just one winner from all the entries so good luck and happy card making!


Thursday, May 24, 2012

I'm Sorry Card


Sometimes you mess up… it happens to all of us.   What’s important is that you make it right, learn from your mistakes and don’t do it again.   Often if you hurt someone, you need to apologize and doing it with a card is a great way to make amends.  This card by Jennifer Holmes makes our Super Star Card list. 


Why it works:   It’s adorable.  Sometimes you just don’t know what to say but you shouldn’t beat around the bush.  Saying your sorry is just the right thing to do.  The adorable Snoopy on his typewriter from Peanuts Joe Cool Peel & Stick pack is irresistible, especially the way she’s made him blush with her Copic markers. 

What you’ll need:
·         Stamps: Peanuts Joe Cool Peel & Stamp Pack (PSA Essentials)
·         Paper: Stamper’s Select White and Smokey Shadow cardstock (Papertrey Ink)
·         Ink: Fresh Snow (Papertrey Ink), Black Tuxedo Momento (Tsukineko)
·         Tools: classic rectangle dies (Spellbinders)
·         Other: Copic markers, Zap Dots (Helmar)

How to recreate it:
                   1.            Cut card base from Smokey Shadow cardstock.
                   2.            Randomly stamp circle stamp in Fresh Snow ink on card front.
                   3.            Using a computer and word processing program, type the sentiment and print out onto white cardstock.
                   4.            Stamp Snoopy image onto cardstock, just below sentiment.
                   5.            Cut out and emboss using rectangle die.
                   6.            Color image with Copic markers.
                   7.            Cut slightly larger rectangle from Smokey Shadow cardstock using rectangle die.  Adhere to other rectangle.
                   8.            Cut a slightly larger rectangle from white cardstock and adhere to previous two pieces. Adhere to front of card using Zap Dots.

Want to win Peel & Stick packs?   If you’re inspired by this card, recreate it exactly or do a variation.   Upload it to our Facebook page!  Each time you share a card on our Facebook timeline, you’ll earn one entry to win 3 PSA Essentials Peel & Stick packs of your choice.   We’ll choose just one winner from all the entries so good luck and happy card making!

Wednesday, May 23, 2012

Housewarming Card


Since buying a home is such a huge investment and a big milestone in someone’s life, it’s a great idea to acknowledge the accomplishment with a card.  This housewarming card by Kelley Eubanks makes my Top 15 Super Star Cards of all time at PSA Stamp Camp.  


Why it works:  Symmetry, symmetry, symmetry.   My eye is happy!  I love the limited, earthy color scheme, too.   The natural twine matches the natural and distressed paper.    The rooster stamp from PSA Topiary Peel & Stick packs is one of my favorites for the home.   Crafts N’ Things magazine also agreed that this was a Super Star card – this was published in the Fall of 2011. 

What you’ll need:
·         Stamps - Country Home by PSA Essentials, Boards and Beams by Papertrey
·         Paper - Kraft, Vintage Cream and Scarlet Jewel by Papertrey
·         Ink - Black/Cabernet by PSA Essentials, Vintage Photo Distress by Ranger
·         Other - Stampin' Up Dimensionals, May Arts Natural String, Rustic Wood Button by Papertrey, Zots glue dots

How to recreate it:
1.       Cut and score 4.25 x 5.5 base
2.       Cut red 3 x 5.5 and cream 2.5 x 5.5 and ink all edges with distress ink
3.       Stamp image and sentiment
4.       Tie twine with button
5.       Adhere all layers with dimensionals

Want to win Peel & Stick packs?   If you’re inspired by this card, recreate it exactly or do a variation.   Upload it to our Facebook page!  

Each time you share a card on our Facebook timeline, you’ll earn one entry to win 3 PSA Essentials Peel & Stick packs of your choice.   We’ll choose just one winner from all the entries so good luck and happy card making!


Tuesday, May 22, 2012

Congrats to the Bride & Groom Card


This card by Carly Robertson makes my Top 15 Super Star cards of all time at PSA Stamp Camp because of its beauty and simplicity.


Why it works:   You only need so much to make a big statement and sometimes -- less is more.   Carly used a limited color palate of white, pink and green.   She added texture with the 3-D flowers and ribbon.   The Mr. & Mrs. stamp from PSA Mr. & Mrs. Peel & Stick stamps is the perfect sentiment for a bride and groom.  

What you’ll need:
·         Cardstock: Papertrey Ink
·         Stamps: PSA Essentials Mr. & Mrs.
·         Ribbon: Papertrey Ink
·         Flowers: craft supplies; gems: A Muse studio.

How to recreate it:
1.       Cut card base
2.       Cut pink frame layer and second white layer
3.       Stamp Mr. & Mrs. & outer ring in lime & pink ink
4.       Add flowers
5.       Tie ribbon and add to flowers underneath

Want to win Peel & Stick packs?   If you’re inspired by this card, recreate it exactly or do a variation.   Upload it to our Facebook page!  

Each time you share a card on our Facebook timeline, you’ll earn one entry to win 3 PSA Essentials Peel & Stick packs of your choice.   We’ll choose just one winner from all the entries so good luck and happy card making!

Monday, May 21, 2012

Super Star Cards & Chance to Win


Card makers rejoice!  These next three weeks are for you.   Since we started PSA Stamp Camp in August 2010, our design team has come up with thousands of cards for all occasions.  I’ve carefully selected the top 15 and am sharing materials, instructions and what makes them super star worthy.   I hope you will recreate them or be inspired by them and share your creations on Facebook with us.  Each time you share a card on our Facebook timeline, you’ll earn one entry to win 3 PSA Essentials Peel & Stick packs of your choice.   We’ll choose just one winner from all the entries so good luck and happy card making!

Today’s card is by Kelley Eubanks and is perfect for sending to a friend you miss. 


Why it works:   The clean and simple style allows the adorable stamp from UBU Caffeine Confidents to shine.   Kelley’s colored the friends up to bring them to life, the red in the girls dress matches the rhinestone.  The twine matches the card stock – it all coordinates perfectly. 

What you’ll need:
·         Stamps - Smirk Caffeine Confidants by PSA Essentials, Sentiment Sampler by Paper Smooches
·         Paper - Kraft and Vintage Cream by Papertrey
·         Ink - Jenni Bowlin Brown Sugar and Fountain Pen by Ranger, Vintage Photo Distress by Ranger
·         Other - Ladybug Doodlebug Jewel, Stampin' Up! Dimensionals, May Arts Natural String, Zots glue dots, Copic Markers - R29 Lipstick Red, E37 Sepia, Y15 Cadmium Yellow, B05 Process Blue

How to create it:
1.       Cut and score 3.5 x 5 base
2.        Cut cream 3 x 4.5 and ink all edges
3.       Stamp and color
4.       Tie twine and add jewel
5.       Adhere to base with dimensional

Each time you share a card on our Facebook timeline, you’ll earn one entry to win 3 PSA Essentials Peel & Stick packs of your choice.  Your card doesn't have to contain PSA Peel & Stick stamps - just a card you think is a super star card created by you!  We’ll choose just one winner from all the entries so good luck and happy card making!What card will make tomorrow’s Super Star list?  See you then!  

Friday, May 18, 2012

Today's the day!


If all goes as scheduled, today, Friday, May 18th is the day I am scheduled to have our second child.  Having had a c-section the first time around with my daughter Molly, I am having a repeat c-section and have come to view it as fortunate enough to be able to walk into the hospital and deliver a baby relatively quickly and easily.  While I am not looking forward to the recovery – no driving for 2 weeks, no lifting anything greater than 10 lbs (including my 2.5 year old daughter) for several weeks, and not getting back to the gym for another 8 weeks, I know every bit of pain and discomfort  is worth it.   We do not yet know the gender of the baby – but we do have names picked out on each side.  What will it be?   Who will it be?   I hope to be able to update this soon with the information.   

These two designs are by our talented Jeanne Streiff.  I adore this “It’s a Boy” goody bag.  


I love this “It’s a girl” card.  The “it’s a girl” sentiment stamped in light pink on the distressed inked heart is so soft.   The girlish pearls are the perfect fit along with the beautiful detailed ribbon.   


Thank-you for all the good wishes, prayers & thoughts!

Thursday, May 17, 2012

Housewarming Gift


Buying a home is such a large investment - when a friend or family member takes that big plunge, it's nice to acknowledge it!  How about a handmade gift? 


Mae Armstrong made this housewarming gift that will truly warm someone's new home.   She started off with stamping "home sweet home" to the card stock paper.  She used the PSA EssentialsPeel and Stick Vanilla Peel & Stick sets.    


Mae pre-cut the labels and distressed the corners of the top layer.   She stamped two bees using PSA Essentials Peel & Stick Country Home stamp set.  


Mae also created a pink 3-d flower and attached it with a decorative pin.   She also prepared beehives to complete the artwork.  She arranged the layout before gluing everything. 


Mae used foam backs for the beehives to give it additional dimension.


Frame and display. That's it! 


Pair this with a PSA Essentials personalized address stamper, and you have the best housewarming gift ever! 


Wednesday, May 16, 2012

Graduation Party Decor


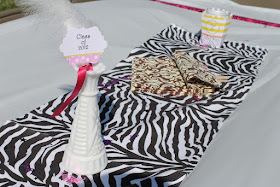
Our designer Angie Holden’s daughter is graduating from high school this month and Angie threw her a party that she won’t soon forget!  Angie created extra special decorations by using her PSA Essentials personalized stamp for “Class of 2012.”    From centerpieces to favor boxes, streamers and cupcake toppers, here’s a peek at some ideas that Angie had that could make your graduation party beautiful. 


Monday, May 14, 2012

Graduation Class of 2012


 Hard to believe that another school year is drawing to a close.  Schools down here in South Carolina get out next week and graduation is only two weeks away.  Do you need crafty ideas for the graduate in your life?  Try these by Kim Moreno.   She’s created a crafty ensemble of a card, gift tags and picture frame.  


Up first, she took an ordinary black picture frame and dressed it up with a banner flag that says “grad.”  Insert your favorite graduate here!  She’s stamped the letters on the triangle flags from PSA Vanilla Peel & Stick stamps.   She used adorable red polka dot ribbon to coordinate with the holiday red ink she chose to stamp in.
 

For the tags, she used precut designs and stamped “2012” from PSA Vanilla Peel & Stick and then “Well Done” from PSA Super Star Peel & Stick.   Fix this on to any gift for a real crafty and homemade touch to whatever you are giving this year for graduation!


No gift would be completel without a card, so Kim created this coordinating one.   She stayed with the same theme of the triangle shaped banners and used the same cardstock so the whole ensemble works well together.   She’s stamped from PSA Vanilla Peel & Stick for the numbers, and sentiment “you rock” from PSA Super Star. 


Congrats to the class of 2012 – more ideas to follow in the next few days! 

Train Themed Birthday Party

Last spring we joined the Island Gymnastics toddler class and arguably the most valuable thing we picked up were a few great friends.   Russell Townes was one of them.  He turned three of Friday and we were invited to celebrate at his fabulous train themed birthday party.  His momma out did herself and threw a party Russell is sure not to forget - even at three!


Sophia did a great job of carrying the train theme through!  She started with a beautiful invitation by Snow & Graham, exclusively for Tiny Prints.


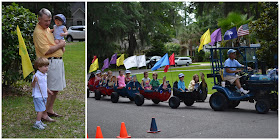
A motorized kids train from Columbia, SC was the highlight of the party.   By my estimate there were nearly 20 kids there and they took turns riding in the train.  Sophia even had cute little conductor hats for them! 


The birthday boy Russell watched from the sidelines the whole time, happily waving the flag until at the very end when Sophia was able to get him on it.   The food was catered by Smokehouse BBQ and guests feasted on yummy cupcakes and cookies afterwards.  There were so many great details to this party! 


Molly and I gave Russell a few books from The Storybook Shoppe in Bluffton, our favorite place for gifts and for picking up new reads.  We made some very quick wrapping paper with our PSA Essentials Peel & Stick stamps.  We used the number "3" from PSA Vanilla and a cupcake from PSA Whimsy Cakes, and turquoise & lime ink.    I let Molly do the stamping on the wrapping paper - it didn't come out perfectly but pretty close! 


She also created a "card" for him.   We used "Skip the Cake and Eat the Icing" sentiment from PSA Dare to Dream.  She then "colored it up" with my Touch Twin markers. 


Happy 3rd Birthday Russell - thank-you for sharing it with us, we had a great time!

Friday, May 11, 2012

Mother's Day Cards


Head to your local Hallmark or card shop and you are sure to find a lot of great cards for this Mother’s Day 2012.   If you have a little extra time the next few days, why not create your own?   These ideas by Vera Yates are easy to recreate and we’re providing you with materials and full instructions so you can get them done quick.  Don’t have a particular item listed in the supplies?  Subsitute!  Use these as a guide.  Mom is sure to appreciate the handmade touch and effort you went into making her card this year. 


Supplies:
Cardstock: (White) Georgia Pacific
Patterned paper: (Country Garden collection) Bo Bunny
Clear stamp: (Topiary) PSA Essentials, (Frame from Fillables Frame #10 set) Papertrey Ink
Distress ink: (Worn Lipstick, Tumbled Glass) Ranger
Dies: (Fillable Frame #10) Papertrey Ink, (Die-namics Little Open Scallop Strip) My Favorite Things
Pearl sticker: Recollection

Instructions:
1. Make card from cardstock.
2. Cut a panel from patterned paper and adhere to card.
3. Die cut the open scallop border and adhere to card.
4. Die-cut and stamp frame and stamp sentiment.
5. Stamp flower three times, fussy cut them, curl them a bit and adhere to card. Add pearl stickers to flowers


Supplies:
Cardstock: (White) Georgia Pacific
Patterned paper: (Orang from Swee Nectar Solid Mat Pad) K&Company
Clear stamp: (Flower from In Bloom set) Papertrey Ink, (sentiment from For Every Woman set) SP & Company, (Solid flower from Asian Icon set) PSA Esssentials
Dye ink: (Rose Romance) Stampin’ Up!
Chalk ink: (Pink Grapefruit, Persimmon)  Versa Magic

Instructions:
1. Make card from cardstock.
2. Cut a panel 3-3/4 x 1-1/2 and stamp the solid flower repeatedly creating border. Adhere panel to card.
3. Cut a strip of patterned paper and adhere slightly overlap the panel.
4. Stamp flower, color, fussy cut it, and adhere to card with pop-dots.
5. Stamp sentiment.

Supplies:
Cardstock: (White) Georgia Pacific
Patterned paper: (Soft Vines) GCD, (green strip from Country Garden collection) Bo Bunny
Clear stamp: (Topiary) PSA Essentials
Distress ink: (Worn Lipstick, Shabby Shutters, Tumbled Glass) Ranger
Dies: (Circle) Spellbinders

Instructions:
1. Make card from cardstock.
2. Cut a panel from cardstock.
3. Stamp flower a couple time on a scrap paper, fussy cut it, and using it as a mask, stamp flower repeatedly in different colors on the white cardstock panel.
4. Cut a panel from patterned paper and layer the stamped panel with thi spanel and adhere to card.
5. Adhere a stip of patterned paper to card.
6. Die cut and emboss circle, stamp sentiment, annd adhere to card with pop-dots.

Happy Mother's Day!