Pages

Wednesday, October 31, 2012

Happy Halloween!

Card by Jennifer Holmes uses PSA Cupcake Peel & Stick stamps

Today is the day that my daughter has been waiting for for over a month!  It seems October is a very long month when you start talking about Halloween on October 1st...  Molly has been to three different pumpkin patches and fall festivals, painting pumpkins, baking cookies, making decorations at home, coloring witches and ghosts at school, and singing Halloween songs now for over 30 days.  The time has come and we are ready for trick-or-treating tonight!

As you might have read a few weeks ago, Molly's costume is homemade by my very good friend Susan DeLano.    Connor is wearing a bat costume from Pottery Barn personalized with his name.  This weekend, we did some pre-Halloween dressing up and attended another fall festival.   Here are some pictures of the weekend.   Enjoy your Halloween whatever you may be doing!


Happy Halloween! 

Tuesday, October 30, 2012

Cinderella ate my daughter


Last weekend we were invited to a birthday party for a four year old girl in Molly’s class.   We were greeted by “the real Cinderella,” girls were indulged with make-up by a princess assistant, they learned a royal dance, and they sat down to a feast of pizza and cake at a banquet table.    This was not your average party.   Molly went dressed in her Snow White costume as the invitation requested she wear her favorite Princess gown…


Like so many young girls these days, Molly has become infatuated with Princesses.  I am not sure where it came from but know that it was only intensified by our trip to Disney World this summer, and seems to be getting stronger at school with her friends.   As her mother, I go back and forth between allowing it and cringing whenever she talks about princesses.   For this reason I just ordered two books Amazon.   I am looking forward to reading them as I think it’s very important that young girls live in the real world – not fantasy land – and grow up with a healthy self-image and realistic expectations of love and beauty.   Sending the right message about make-up, dressing up, your body image, Prince Charming, and falling in love is a tricky subject!  I don’t want to mess this one up.


At the same time, kids must be kids.   I do think it is okay to indulge the fantasy from time to time and for that reason, I like this DIY magic princess wand by Krissy at B-Inspired Mama.  I like the idea even better because it is a project you can do with your daughter!  Perhaps while creating the wand it’s a good time to have a discussion about who a real princess is. 


Krissy has used a stamp from UBU Dress Up – a great stamp set for little girls!   Haven’t seen this one? Click here!


She also used the following supplies:
·         wooden star wand
·         Krylon Spray Paint in Sunlight
·         white, purple, and lavendar card stock
·         circle cutter
·         2" scalloped circle cutter
·         Kids' Mod Podge
·         sponge brush
·         colored pencils
·         UBU Dress Up Stamps
·         PSA Essentials Black Ink
·         Sparkle Mod Podge
·         Martha Stewart Glitter
·         satin ribbon
·         Allene's Clear Tacky Glue

Head on over to her blog for a full tutorial on how to recreate this project.    I love how beautiful the stamp is here!   

Monday, October 29, 2012

Halloween Stick Puppets


We've been going to library every Monday afternoon after school pick-up.   After Molly, Connor and I return last week’s books and select our new ones, Molly dashes to the children’s area to color and do a puppet show.  She puts on a great show for us!  When I saw this idea by Krissy at B-Inspired Mama, I immediately knew that Molly would love them and I cannot wait to recreate them.  Krissy had the brilliant idea of turning our PSA Essentials stamps into stick puppets!  She went with a Halloween theme here.  


For this project, you will need:

·         colored popsicle sticks
·         white, orange, purple, green, and yellow card stock
·         circle cutter
·         Kids' Mod Podge
·         sponge brush
·         colored pencils
·         Aleene's Clear Tacky Glue
·         UBU Happy Halloween Stamps by PSA Essentials
·         PSA Stamper, Black Ink by PSA Essentials

Krissy started with stamps from UBU Happy Halloween by PSA Essentials.   She stamped on white paper and colored in with colored pencils.   She took a lot time and paid a lot of attention to each detail of the stamp, which really brings them to life! She carefully cut them out and adhered to colored cardstock cut out with a circle cutter.   Then she Mod Podged them to seal them all together and give a nice clear coat. 


Could they be any cuter?  What kid wouldn’t love these.   I can see great stories told and great puppet shows with these!   

Friday, October 26, 2012

2012 Holiday Cards


I spend an above necessary amount of time on my holiday cards.  I seriously spend hours and spend hundreds.   The first task is selecting the right design for the card itself and there is no shortage of great designs this year.  I have an entire board on Pinterest dedicated to finding the right card and have been pinning ideas from Swanky Press, Minted, Shutterfly and all of my favorite stationery stores for months.   Check my board out and let me know what you like best for 2012.

After selecting design, the next hurdle is to find the right pictures. I agonize over this for –again – an unnecessary amount of time.   I like having a photo of Molly (and now Connor) that’s as close to Christmas as possible so that it’s “current.”   I take some pictures all dressed up in Christmas gear and fancy outfits but invariably end up choosing an everyday shot of Molly on the beach on our Thanksgiving vacation.   This was our card last year…


My next quest is the perfect holiday address stamp.   The envelope should be as perfect as the card and picture itself.   Quite obviously I use my PSA Essentials personalized address stamp and switch up my middles for a holiday theme.   Last year I used four different ones, 2 from PSA North Pole and 2 from PSA Tree-O.   I used hunter/red ink to be even more festive.     Which do you like best?  I am a big fan of the “Happy Holidays Letter.” If you have been lusting after a personalized stamp, you’re in luck because they’re on sale at Cyber Savvy Shop right now for just $26.00.  If you want festive holiday designs, you can add a Peel & Stick pack to your order for 25% off, or just $11.25.    


The next step for me is to find the right postage stamp.  I love vintage ones from Paper Nickel Stamp Company. They’re real postage stamps from the 40’s, 50’s, 60’s and 70’s!  Stack them up and they look superb on your envelopes and really stand out in the clutter. 


So what are you doing for your 2012 holiday cards?  It’s about time to start thinking of them, don’t you think?

Thursday, October 25, 2012

Stamped Anniversary Candles


Are you in need of a wedding anniversary gift?   Grab two ivory, white or cream candles and stamp the couple’s initials and wedding date on them!   You’ll have a personalized and crafty gift in minutes.   Added bonuses:  this gift won’t break your bank and it’s incredibly thoughtful!


This idea comes to us from Ashley at Cherished Bliss.   She used stamps from PSA Vanilla Peel & Stick and her acrylic blocks.  When recreating, don’t worry about getting a “perfect” stamp here – you won’t likely achieve it and that’s okay!  That’s part of the character.   Be sure to rotate the stamp a little to get full coverage on the rounded surface. Then spray a thin layer of hairspray from a good distance, let dry and repeat about 3 times.  The couple is sure to be appreciative of this personal gift! 

Wednesday, October 24, 2012

Harry Potter Halloween Mantel

How's this for Halloween festive?


Gina at The Shabby Creek Cottage created a spooky masterpiece for her mantel inspired by Harry Potter!  She included "Brews, Spells and Potions" stamped using her PSA Stamper and Archive and Vanilla Peel & Stick packs.


What spooky Harry Potter mantelpiece decor would be complete without Frog parts and a Love Potion? These were done in PSA Vanilla and PSA Romance Peel & Stick packs.


She used distressed wood and her PSA Vanilla, Romance and Archive Peel & Stick stamps for the background. 


Ta-da! 


Tuesday, October 23, 2012

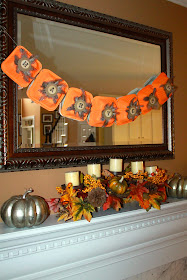
Harvest Banner

I love a project that satisfies the following three criteria:

  1. Something that's recycled. (It's nice to be good to the earth.)  
  2. Something you can do with your kids.  (The more hours their occupied -- the better, right?)  
  3. Something that also looks great.   (Who needs a junked up craft?) 

Mae Armstrong's seasonal project captures all three things today! It's a Harvest Banner.   Mae's hung it from her fireplace mantel and it looks fabulous.


Mae's little boys painted to-go boxes with orange acrylic paint from their deli right by their house.  It was a perfect rainy day activity!  First, cut the box in half and trim the sharp edges before painting.


They used sponge for painting so it was quick and easy to do.  (I'm sorry to distract, but aren't they the cutest?) 


Dry for a few hours before decorating.


When dry,  hot glue some feathers.  Best to let Mom do this one.


Mae then added a decorative circle label. Next she stamped a wooden disc each to spell Harvest and glued it on the circle tag.   To spell it, Mae used PSA Essentials Archive  Peel and Stick stamp set.  Punch holes to attach decorated boxes onto a natural string.


Didn't this turn out festive?  


Monday, October 22, 2012

Paper Crafts Magazine - Winner of PSA Giveaway


Last week we hosted a giveaway on Paper Crafts Magazine Facebook page and had an astonishing number of entries for 1 custom stamp, 1 Peel & Stick pack, 1 box of stampable stationery, a 2-color ink, and free shipping to the winner.    One person gets all of this great stuff! 


PSA Essentials personalized stamps are perfect for stamping your address on your every day correspondence, bills, invitations and anything you have to send through the good old mail.  They're even better this season for your holiday cards because of our patent-pending Peel & Stick technology, you can switch out the center design for a festive holiday one.  Your holiday cards could look something like this - whether you design your own cards, or purchase them and just dress up your envelopes.  See what I did last year.  


In addition to letters and correspondence, our stamps are great for all your crafting too... we have hundreds of designs from Peanuts to Hello Kitty and original designs for every season and occasion.  This blog is dedicated to all the crafty things you can do with PSA Essentials Peel & Stick stamps like create cards, scrapbook layouts, paper crafts and DIY projects.  I hope you will join us daily for design inspiration! 


Card by Kelley Eubanks uses Hello Kitty Trick or Treat Peel & Stick stamps

Congrats to the winner - you lucky girl, Kristin Suthard.  Please email loregan@psaessentials.com to claim your prize! 

If you aren't Kristin, you're in luck if you want a personalized stamp.  They're on sale for just $26.00 at Cyber Savvy ShopPeel & Stick designs are 25% off (or just $11.25) right now during their pre-season Christmas sale.  Head on over to buy one now! 

By the way, have you seen their latest issue? I'm sure you have! We're a fan of all the different styles this time around in Paper Crafts Magazine.  From clean and simple to shabby chic, there really is something for every card maker and paper crafter.  Thanks for the giveaway Paper Crafts! 


Happy Harvest

Welcome Fall!  This beautiful card by Regina Mangum celebrates the season perfectly.  She’s stamped Hello Kitty from Hello Kitty Garden Club, colored her up with her Copics, and used some great patterned papers called Harvest Lane by Simple Stories.   She’s layered different cardstocks, leaves and the stamped message “Happy Harvest” to create a multi-dimensional effect.


Seriously,  how cute is this?


I just love this time of year.  Last weekend we took a trip to Holliday Farms in Ridgeland, SC to celebrate the harvest ourselves.  We took a hayride to the pumpkin patch, watched a pig race, fed the farm animals and had a very “country” afternoon. 


How are you celebrating the season? 

Friday, October 19, 2012

Monster Dip


My 3-year old daughter Molly had a Halloween costume fitting a few days ago with our costume designer, former PSA Essentials design team member, babysitter, published crafter and best friend Susan DeLano (she has a lot of titles in our house!)   This year Molly is a “nice witch.”  We went to JoAnn’s Fabrics in Savannah a few Sunday’s ago to pick everything out – the pattern, the fabrics and the accessories.  Our first fitting was a lot of fun and Molly enjoyed trying everything on and getting a sneak preview.   Susan’s busy “perfecting” the fit now.


We are having our friends The Bradfords over for Halloween this year.   Their daughter Parker is truly Molly’s best friend!  (Parker’s still deciding on a costume… rumors of a tennis player are circulating.)  Before we head out trick-or-treating, I am hosting a dinner party for our families.   I was inspired by this idea from Jessica Hill at Mad in Crafts for a special snack for the girls.  It’s Monster Dip and Jessica showed how fun it can be by decorating it with her PSA Essentials Peel & Stick stamps.


Jessica stamped the letters to spell Monster from PSA Archive Peel & Stick stamps and the outer ring from PSA Haunted Shack using her PSA Stamper loaded with lime green ink.   She stamped “dip” from PSA Vanilla Peel & Stick stamps.   What is “Monster Dip” anyway?   Check out this fabulous recipe I found from Skip to My Lou.   Sounds delicious.  And dangerous!

Monster Cookie Dough Dip

8 oz. Cream Cheese, softened
1/2 Cup Butter, softened
1 Cup Creamy Peanut Butter
1 Cup Powdered Sugar
3 Tbsp. Brown Sugar
1 tsp. Vanilla
1 Cup Oats (regular or quick)
1 Cup  Miniature Plain M&Ms
1 Cup Miniature Semi-Sweet Chocolate Chips

Mix cream cheese, butter, vanilla and peanut butter until smooth.  Stir in brown sugar and powdered sugar, mixing well. Next fold in oats, m&ms and chocolate chips. Serve with pretzels or graham cracker sticks.

I think this is the perfect treat for Parker and Molly.  And the adults will love it too!  I cannot wait for Halloween this year – more to follow!