Monday, April 29, 2013

Save the date!

If you read Friday's post, you saw some great wedding theme and venue inspiration.  After you've decided on the type of wedding you want (beach, destination, mountain, rustic, farm, formal ballroom, for example), you need to select the actual location.  But the location has a lot to do with the guest list.  Clearly you don't need a ballroom for 500 if you are only having 75.   So start by making a list. 

This can be one of the hardest parts of wedding planning.  When it came time to discuss guest list for my wedding, my mother-in-law said to me, "This is my A list, there is no B list." Turns out her A list was 75 people! Luckily I wanted a wedding with about 200 people so it all worked out.  I have heard other stories where brides weren't so lucky.  


According to The Knot.com, you should follow these rules when planning your guest list: 

  1. Stay Mum.  Don't call everyone you know about your engagement because it prompts their question: "So when's the wedding?" and they assume they're invited. 
  2. Divide Seats Equally.   Bride gets 50, groom gets 50 - or whatever number you guys choose. 
  3. Don't get bullied by in-laws or parents.   Stick to boundaries once you establish them. 
  4. For co-workers or certain groups of friends, subscribe to the all or nothing rule.
  5. When you are over your limit, cut, cut, cut! Here are The Knot.com's "rules" for cutting: 

  • Rule #1 If you have never spoken to, met, or heard the name of a particular guest, he gets cut, even if dad swears they're close as clams.
  • Rule #2 Anyone whose bedtime occurs before 9 p.m. will miss the cake cutting, so don't feel bad about nixing all the under-12-year-olds.
  • Rule #3 Single friends who want to bring a significant other only get an "and guest" if they've been in the relationship for a year or more (or live with the person).
  • Rule #4 It's your party -- if you don't want them there, don't feel guilted into sending an invite, even if you were invited to their wedding or they are friends with lots of people who will be invited. With a little bit of forethought, mastering your guest list is a breeze.

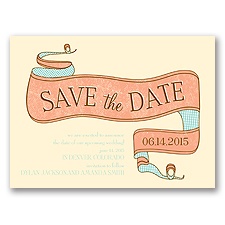
When you have your guest list ready, you can set your location and date.  Next you will want to order save the dates to get on people's calendars.  Keep in mind that if you send a person a save the date, you must send them an invitation.   Your save the date also traditionally coordinates with the invitation.   I like some of these save the dates found on Invitations by Dawn.   If you haven't heard of this site before, definitely check them out.  They offer stylish designs at an affordable price. 

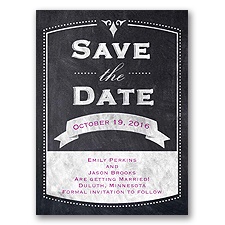
Chalkboards are so in right now !

Old School - Save the Date Card


This is a post card style save-the-date!

Chic Chevron - Orange - Save the Date Postcard

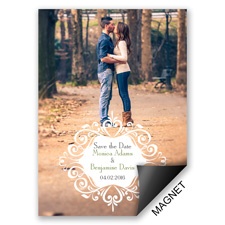
Here's a save-the-date magnet: 

Filigree Crest - Save the Date Magnet

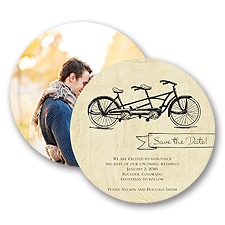
Also popular and trending are different shapes (not just a square or rectangular shaped card).  Like this circular shaped save-the-date card: 

In Tandem - Save the Date Card

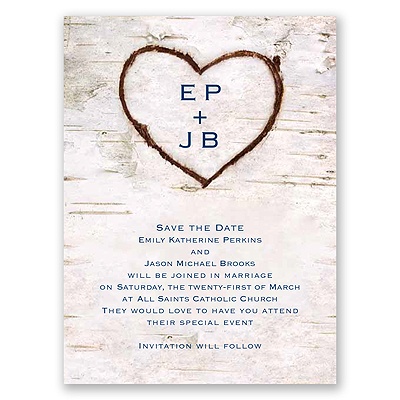
Rustic seems to be a trend, too. 

Carved in Love - Save the Date Card

There are so many great options at Invitations By Dawn

Vintage Banner - Ecru - Save the Date Card
Of course when sending out your save-the-dates, bridal shower invites, wedding invitations and thank you cards, you want the envelope to be stylish and cute, too.   PSA Essentials personalized stamps make a great addition to your invitation suite.   Here's mine when I got married! 


We'll be sharing more invitation styles and ideas, plus discussing reception trends and top favor ideas all week long!  

Friday, April 26, 2013

Wedding Planning Tips


Engaged or planning a wedding with your daughter?  Congratulations! We have some expert advice, tons of inspiration and money saving tips to share this week with you here on PSA Stamp Camp.

Last year I introduced you to my friend Amanda, owner of Spencer Special Events here in the Low Country.  For ten years, she's been in the hospitality and wedding planning industry.  Her weddings have been featured on Style Me Pretty, Smitten, Wedding Wire and in Charleston Brides magazine.  So what's her first piece of expert advice to share?  Simple: enjoy the engagement.  Then it's to decide on what type of wedding you want.

“Be it destination, formal, church ceremony, plated dinner, casual, beach ceremony, stations… what do you envision?” says Amanda.   After that comes to a few hard questions to narrow things down.   What can you spend, who’s paying for what, and how many people are you able to invite?  These answers will help find the perfect location and get the ball rolling for your big day.   

I went on search different types of weddings.  Do you want a mountain wedding? 

what a location!

Rustic, DIY, romantic type of wedding?

burlap and lace

Nautical wedding?

tables

Black and white modern wedding?

white

Floral chic wedding?

gorgeous colors

A beach wedding?

Beach wedding flowers

Formal ballroom wedding?

Formal, Indigo, Ballroom Wedding - Reception,  Centerpiece,  Ivory

The possibilities are endless and there are so many ideas out there.  Tomorrow we will take a look at invitations for weddings!   Have you entered our giveaway yet?


Thursday, April 25, 2013

Personalized Nursery Banner

I wonder how many times I have written the word "personalized" in the last three years.  At PSA Essentials, we are all about things personalized.  Having something personalized (see, I am already up to three times in one post!) makes things more special.   More intimate.  Closer to home.  Take this nursery banner designed by Jessica Hill at Mad In Crafts.   Personalized banners to display in the nursery really make the room feel theirs and this one is beautifully designed and crafted.

Personalized Banner for a Nursery

Jessica has stamped "addie" using PSA Vanilla Peel & Stick stamps on white paper.  She's adhered them to larger glittery rounds, then even larger scalloped rounds and then tied together with ribbon.   Check out her complete tutorial on her blog.   See how you can make this as a gift or for your own little one!

chipboard flowers


Wednesday, April 24, 2013

Kids Journals on a budget

It would be considered an "overshare" to go into specifics, but I am on a new (and tighter!) budget these days.  Many people are in my boat.   They're trying to be much better with their money now -- carefully saving and watching how they spend every dollar.   But even though I have to save and be more careful about spending, that doesn't mean I can't live my life - I just have to be more creative about how I do it.  I love crafting and DIY projects so now I just have to find thriftier ways to satisfy my hobby.

Here's a fantastic idea by Jessica Hill at Mad In Crafts.   She's created kids journals made from recycled cereal boxes.   These are a fantastic party favor, birthday party gift, or something for your kids.  Jessica has  stamped using PSA Vanilla and PSA Rocket Peel & Stick stamps, by PSA Essentials in this fun project.

Journals for Kids Made from Cereal Boxes

Head on over to Jessica's complete tutorial and see more about this project.   It's extremely impressive to see how she did it!

bound journals from recycled cardboard


Friday, April 19, 2013

Teacher Gift

As long as I was on a roll sharing Mae Armstrong's designs of Sugar Body Scrub and her DIY Learning Numbers game, I thought I would share a third project today:  a DIY Teacher's Gift.  This gardening kit with message:  "thank you for helping me grow"  is such a cute idea and Molly's teachers at May River Montessori would just love it.


Mae started by designing a printable gift tag.  She created a blank circle for the stamped initials.  She used PSA Essentials Archive Peel and Stick Stamp set for the initials.  She also used the corresponding outer circle to perfectly frame the letters.

 Teacher Gift - Packaging Idea


She punched a hole and looped through a pink and white twine.

Teacher Gift - Packaging Idea3


Teacher Gift - Packaging Idea5

She picked a few items at the Dollar Store to create the simple gardening kit: tools, gloves, and some seeds. 

Teacher Gift - Packaging Idea2 

She stuffed the glove with all the goodies and wrapped the stamped tag.  That's it.  It's such a simple way to show your appreciation! 

Teacher Gift - Packaging Idea4

Teacher Gift - Packaging Idea6


Thursday, April 18, 2013

Graduation Cards

Today I have two cute cards for graduation coming up next month.  Whether you know someone graduating preschool, middle school, high school or college - a handmade card sure is a nice idea.  We've got you covered with some great card ideas over the next few weeks.   Up first, here are two by Jennifer Ingle.

She's used our "congrats" stamp from PSA Just A Note here in this clean and simple style card.


She's used various Snoopy stamps from our PSA Peanuts collection here.


Adorable! 

Wednesday, April 17, 2013

Learning Numbers Peg Board

I love this learning numbers game and DIY project by Mae Armstrong.  She is always doing something truly awesome for her kids.  This project is a perfect way for kids to understand numbers as values and associate them with the digit.  

First Mae started with a 2"x4" wood scrap.


Learning Numbers April project

Plan your number spacing before stamping. If you want to be absolutely sure you can measure the space in between and mark them with a pencil.

Learning Numbers April project 2

After stamping mark the holes for the pegs and drill the appropriate number of holes. After drilling use a sanding block and smooth out the surface of the wood.

Learning Numbers April project 3

Use a fine sanding paper.

Learning Numbers April project 4

Feel the surface to make sure there are no rough spots. Then use a Crystal Clear Acrylic spray to seal to protect the wood and also the stamped surface.  This is one of Mae's strengths.  She really goes above and beyond to make it a complete project.  (I would have skipped the spray!) 

Learning Numbers April project 5

Mae picked up package of wooden golf tees at Walmart.

Learning Numbers April project 6

Here's my son concentrating on placing the right number of pegs.

Learning Numbers April project 7

I just love this project. Hope you enjoy it too!

Learning Numbers April project 8

Learning Numbers Potrait


Tuesday, April 16, 2013

DIY Body Scrub


Mae Armstrong created a big batch of brown sugar body scrub and turned them into teacher gifts. This homemade, DIY idea is surely one you will want to create!

Ingredients
Organic Coconut Oil (1 1/2 cups)
Virgin Olive Oil (1/2 cup)
Brown Sugar (2 cups)
Lemon Juice (5 tbsp)
Lemon Zest (2 tbsp)

First, Mae tells us to mix all the ingredients.  Make sure there are no lumps! 

Teacher Gift - Brown Sugar Body Scrub

Mae designed a set of circle labels to decorate the packaging. Punch circle tags using a 2" circle puncher and glue onto the tops.

Teacher Gift - Brown Sugar Body Scrub2

Transfer and divide into mason jars. Seal and secure lids.

Teacher Gift - Brown Sugar Body Scrub3

Decorate the jars with ribbon and attached the circle label.

 Teacher Gift - Brown Sugar Body Scrub4

Mae also prepared stamped circle tags and attached it with a pink ric-rac ribbon. She used her custom stamp from PSA Essentials and that's it!  Easy and super cute.

Teacher Gift - Brown Sugar Body Scrub5

Monday, April 15, 2013

Strawberry Fields Forever

We took a trip this morning to Dempsey Farms on St. Helena Island outside of Beaufort, SC to have some good ole fashion, quaint fun by picking strawberries.   What fun!  It's a real working farm and grows various fruits and vegetables that are available for picking year-round.  Here's a look at our fun adventure...


And now that we have 5 lbs of strawberries, we're making strawberry jam tonight.  Paired with my canning jars and my "from the kitchen of" PSA Essentials personalized stamp, I have a great gift for Ethel who's watching Connor AND Molly this week while Molly's out on spring break from school.   Photos to come!