Friday, December 14, 2012

DIY Holiday Gift Idea: I-Spy Travel Game


Traveling with the little ones during the Holidays can be crazy.   Today's gift idea is for a friend of yours with kids, someone that you know will be traveling and will need a distraction for their wee-ones.  It come to us from Mae Armstrong and I happen to think it's genius!   It's an I-Spy Travel Game!

I Spy Travel Game2

Mae's twin boys are into spy books and enjoy finding different cartoon characters on each page. So she thought to create a simple and portable new toy without spending too much money. An I-Spy Travel game! 

Mae started by saving two mini water bottles. Let them dry over night to get the moisture out.  She selected fun Christmas themed buttons and silver bells from the craft store.  You can use anything here that the gift recipient is into.  

I Spy Travel Game 

Use a plastic funnel to help pour the rice inside the water bottle.

I Spy Travel Game_4

Pour half a cup of rice inside the bottle, fill with buttons and bells and cover with the remaining rice. Seal top with glue. (Mae sealed it with glue because she doesn't want her little boys to open the top and empty the bottle of rice. Can you imagine THAT all over an airplane or the back seat of your car?  Yes, let's everyone seal with glue!) 

I Spy Travel Game_42

To make this a gift, Mae created a simple gift tag using her new sentiments Peel & Stick collection.  She selected "oh happy day" stamp and stamped it on a gift tag.  Write the name of the recipient on the other side of the tag. 

 I Spy Travel Game_43

How awesome is this? I sure wish I had it for my daughter on the plane on our last vacation!  What a great DIY gift for kids (and certainly a gift for the parents, too!) 

Thursday, December 13, 2012

DIY Holiday Gift Idea: A Yo-yo


Today is our third day of DIY gift ideas for the holidays!   When you need a stocking stuffer for the kids, look no further than this idea by Gina Luker at Shabby Creek Cottage.  You will need to find a yo-yo at Toys R Us or Michael's in heir "wooden craft" aisle.   Make it extra special (and enter the "DIY" part of the project) by stamping a Christmas tree from PSA Whimsy Tree Peel & Stick pack.  Use your acrylic block here if our PSA Stamper is too big for the circumference of the yo-yo.   Then color it in with permanent markers like Copics or Touch Twin.  Even colored sharpies would work great here.    You will want to spray it with a good top coat and finishing spray, just so the colors don't bleed into the wood further.


Cute one, isn't it?   And oh, how simple!

Wednesday, December 12, 2012

DIY Holiday Gift Ideas: A Puzzle


Welcome back to day 2 of our week-long series on DIY holiday gifts.  My favorite puzzle company is Eeboo, they make beautifully designed puzzles that are fun to play and educational.   Molly loves her pre-school colors puzzle (it's almost too easy now), her Animals one, and her Alphabets one.  You've got to check this company out if you have kids and haven't seen them before. 

The problem with these puzzles is the same problem I often have with things that I really like. They're expensive!  They range from $15 - $30 each.  Krissy at B-Inspired Mama has a great puzzle idea that will only cost a fraction of this.  It's educational, too and I am sure Molly would have a lot of fun doing it.


Krissy put together this amazing tutorial to help you create this puzzle at home.  

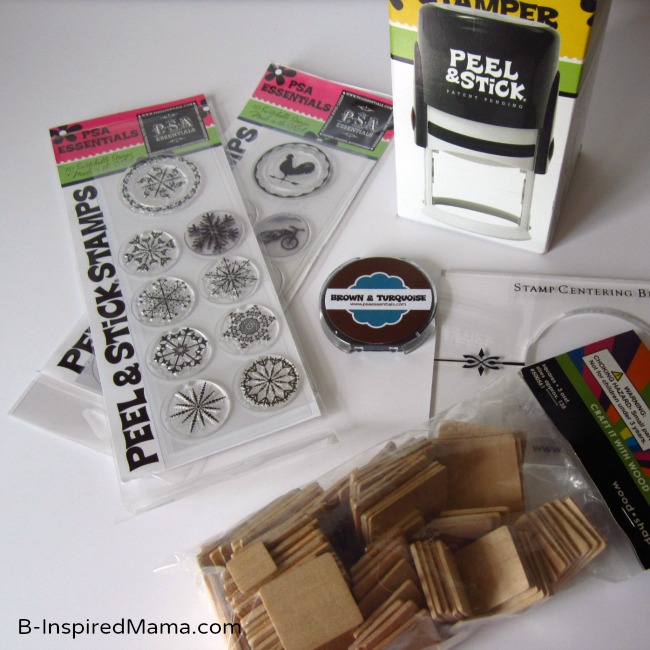
Supplies to Make a Puzzle: 


Supplies to Make a Puzzle with PSA Essentials at B-InspiredMama.com

How to Make a Puzzle, step by step: 


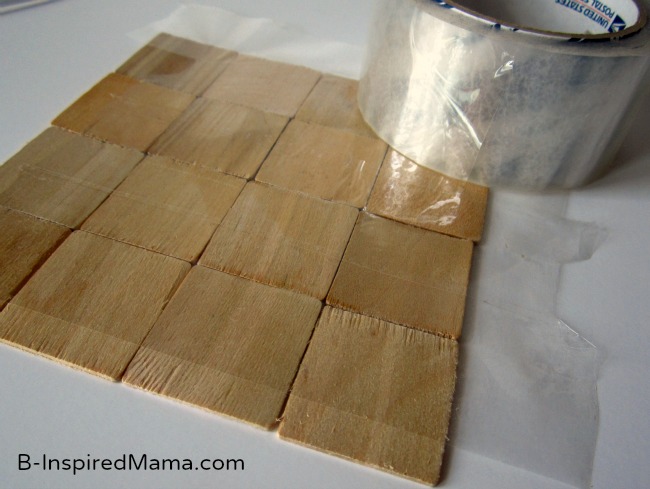
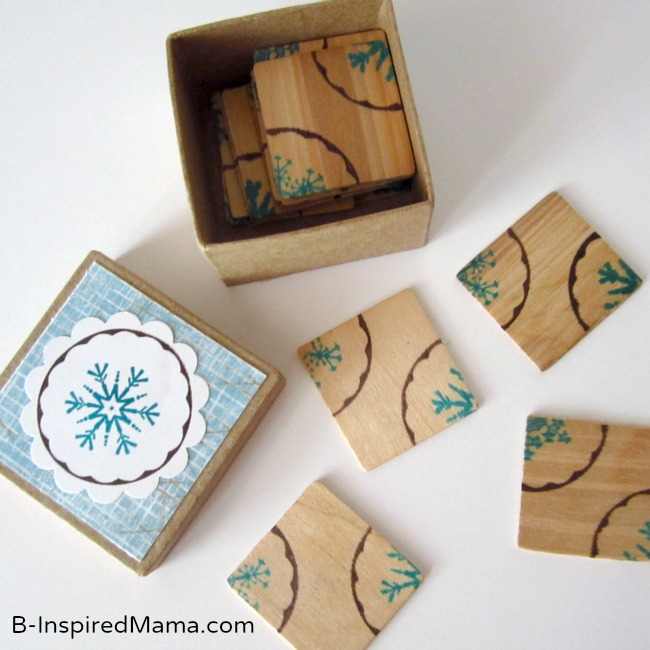
1. Lay out 16 wooden square tiles in a 4 x 4 square pattern. Carefully place strips of tape over all of the squares, holding them together in the 4 x 4 pattern.
Use Tape to Make a Puzzle with PSA Essentials at B-InspiredMama.com
2. Carefully flip the squares that are all tapes together over.  The tape underneath will hold them together while you stamp on them.
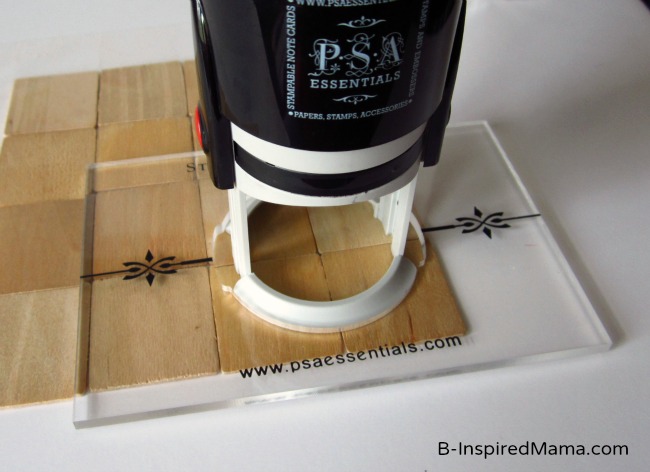
3. Stamp a snowflake at each four corner intersection.
Use PSA Essentials Stamps to Make a Puzzle at B-InspiredMama.com
4. Spray the stamped tiles with acrylic sealer and let dry.
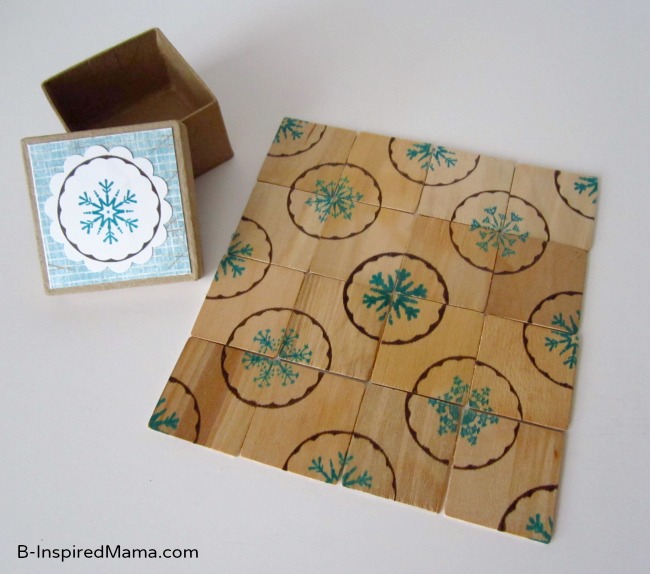
5. Remove tape from tile puzzle pieces.
Make a Snowflake Puzzle with PSA Essentials at B-InspiredMama.com
6. Use some scrapbooking paper, the scallop cutter and paper trimmer, dot adhesive, and another snowflake stamp to decorate the top of the paper mache gift box.
7. Store the tile puzzle pieces in the gift box and use as a stocking stuffer or holiday gift.
DIY Snowflake Puzzle with PSA Essentials at B-InspiredMama.com

How fabulous is this?  I just love the idea.  Great work, Krissy and thanks for the tutorial, too!  Head on over to her blog for 55 great DIY kids gift ideas.   What an amazing list she has compiled! 


Tuesday, December 11, 2012

DIY Holiday Gift Idea: Monogrammed Coasters


Ginger Bowie is one of the craftiest people I know.  She writes an amazing blog called "Ginger Snap Crafts" where she shares crafty ideas DAILY.  I am not quite sure how she has so many creative ideas, the time to shop for the supplies, create the projects, edit her photos (brilliantly, I might add!) and then write tutorials like she does.  Did I mention she also has FIVE kids? I complain about managing two.  She seems to effortlessly manage all this and FIVE?  Anyway... I'll just get to our series on DIY Holiday Gift Ideas!  Today's idea is by Ginger, and she has created Monogrammed Coasters!


This is so simple!  For this project, you will need:

  • PSA Essentials Archive Peel & Stick stamps 
  • Coasters 
  • An acyrlic block 
  • Black ink (must be permanent!) 
  • Ribbon 
  • A permanent fixative, that is water resistant. 


Load your Peel & Stick stamps on your block, dip in the ink, and stamp on the block!  Use a ruler to line up if you are concerned with placement.  Mark it with a pencil if you really want to be exact on each one!


Once you stamp and let it dry, be sure to spray with a fixative that is water proof.   There you have it, you've  transformed a boring coaster into something personal.  Tie the stack with a ribbon and you have a great hostess gift, stocking stuffer or small gift for the holidays!


Monday, December 10, 2012

DIY Holiday Gift Idea: Girls Headband


Welcome to a week long series on PSA Stamp Camp: DIY Holiday Gift Ideas!  We have money saving, crafty ideas for everyone on your list.   The holidays can get super expensive.  I try hard to stick to a budget, but even my budget is probably over budget.  Handmade gifts are a great way to save money.  If you have some patience and crafty passion and skill, a little goes a long way.   Up first is this DIY headband by Krissy at B-Inspired Mama. 


Krissy used a stamp from PSA Rosettas Peel & Stick pack to adorn this pretty-in-pink head band and bow.  She used her trusty colored pencils and her favorite Mod Podge, too.   See how the stamp really pops? 

PSA Essentials Flower Stamp for Embellishing Hair Bow at B-InspiredMama.com
You will want to head to Krissy's blog for the full supply list and tutorial.   This is a great stocking stuffer for little girls, don't you think?   I am pretty sure my 3 year old daughter would LOVE it and Priscilla (Krissy's daughter) is going to jump for joy!

See you tomorrow for another great idea by Krissy! 


Friday, December 7, 2012

Snow Globe Card

Do you make your own holiday cards, order online or buy from a stationery store?  I just ordered my photo ones from Minted this week.  I love their rich, thick paper and high quality printing. (I was a print making major after all, which my mother attributes my love of paper and stationery.)  I send out 175 cards to friends and family so making my own individual cards isn't feasible.  But I would like to find the time this season to make a few so when attending holiday parties, I can bring one with a small hostess gift.

Shelly Kurth has an awesome idea.  It's a snow globe shaker in a card!  She's used stamps from PSA North Pole and PSA Whimsy Tree Peel & Stick packs.


Here it is up close.  Look at all that glittery snow! 


Head on over to her blog for a full tutorial and supply list.  This is truly a great card that you will want to create and let us know today what you think of it.  More cards to come! 


Thursday, December 6, 2012

DIY Ornament

I've noticed that when one of our talented designers (Ashley from Cherished Bliss) does a project, she almost always has multiple uses for it.  An Ashley project has several uses or several purposes.  First case in point, her advent calendar which also was a tree decoration, ornaments, and a game.   New case in point, her DIY Ornamnet.   It's also a wish list and a decoration to display around the house.

Kid's Wish List and Wooden Spool Ornament via Cherishedbliss.com // #Christmas #Ornament
She's used her PSA Essentials Fancy Flakes Peel & Stick pack for this one!  I love how crisp the stamps turned out.

Kid's Wish List and Wooden Spool Ornament via Cherishedbliss.com // #Christmas #Ornament
Her kids have written their wish list on the red paper! She cut a strip of scrapbook paper and used washi tape to secure it to the spool.   

Kid's Wish List and Wooden Spool Ornament via Cherishedbliss.com // #Christmas #Ornament
Head on over to her blog to see her full tutorial and more great pictures.   Another thing Ashley is great with: pictures!   I have to admit, this is one of the more out of the box ideas I have come across in the last few years.   Very creative!