Thursday, January 31, 2013

Paper Strawberries for Valentine's Day


Paper Strawberries - School gift7

Mae Armstrong made these adorable paper strawberries for Valentine's Day and thought they'd be great as a school gift.   Students in Molly's school (and Molly!) would love these at their Valentine's Day party!

She started by cutting the paper patterns using her Silhouette machine.  She selected different patterns and shades of pink for he body of the strawberry and picked a green polka dot paper for the leaves.   She used twine and the "Be Mine" from PSA Essentials Happy Holiday Peel & Stick pack.  

Paper Strawberries - School gift 

Fold all along the lines and secure with double sided tape. Thread twin through the holes.

Paper Strawberries - School gift2

Insert your wrapped candy inside the strawberry and pull twine. Tie a knot and secure.

Paper Strawberries - School gift3

Paper Strawberry

Add the leaves, tie and add the stamped tag.

  Paper Strawberries - School gift4

Tie into a bow and secure the tag.

Paper Strawberries - School gift5 

That's it simple and really cute! 

Paper Strawberries - School gift6

Wednesday, January 30, 2013

Valentine's Day Cards


In a few short weeks Valentine's Day will be here.   How many Valentine’s are you creating?  My list is long so I better get started.   Good thing we have great and simple ideas by Vera Yates.   These ideas don’t require a lot of materials, any embossing, ribbon tying, layering or much at all.   Yet they are beautiful and say everything you need to say.    Check them out!

Vera created this easy “be mine” card with just five materials:   her PSA Stamper loaded with holiday red ink, PSA Vanilla Peel & Stick stamps, and UBU Bicycle Bride stamps by PSA,  craft cardstock, and the sentiment stamp “be” by Bo Bunny.    


She created this one with just as few materials.   She stamped the bird from PSA Love Birds, and spelled “Valentine” using PSA Vanilla Peel & Stick stamps.     These cards are clean and simple and pack a huge punch.  It’s a good reminder not to be scared of negative space in your cards!  You do not have to fill up every inch.   Some times less really is more!


Tuesday, January 29, 2013

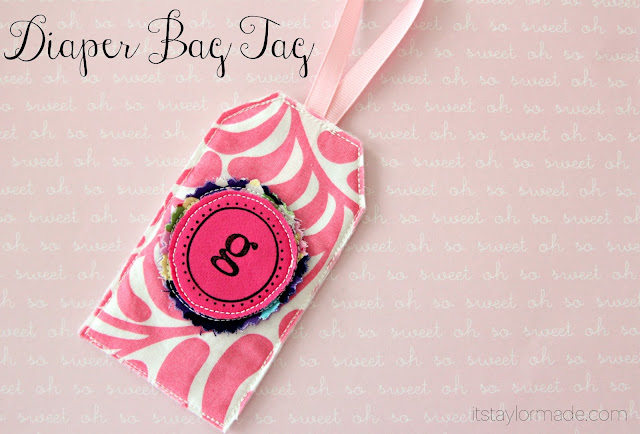
Diaper Bag Tag

A question for our mommy readers: do you have a diaper bag tag?  They're all the rage!  A tag on your bag such as the one here is a great way to jazz up your diaper bag and make it personalized without having to personalize the bag itself.  And Taylor Urban on our design team shows us how to do it at home so you don't have to spend $15 or more online.  Homemade is better anyway, isn't it? 


Taylor started by stamping the "g" from PSA Gigi Monogram stamps on pink linen fabric.  She used her PSA Stamper loaded with black ink. 


She sewed it up...


Head over to Taylor's blog to find out more!


Monday, January 28, 2013

Valentine's Day Pin Cushion

Mason Jar Pin Cushion Portrait

Our design team member Mae Armstrong was looking for a quick gift for Valentine's Day and came up with this super cute mason jar pin cushion.  I love the homemade gift, it's perfect for anyone you know that's crafty or likes to sew.

Mae started by cutting natural fabric around the lid of the mason jar. She used the "Muah!" stamp from PSA Essentials Smile Peel & Stick pack. She stamped the word all around the trimmed fabric in holiday red ink by PSA Essentials.  Then she glued the fabric to the cover of the lid.  She left a small opening to fill with fiber.  Once done, she glued the opening shut to secure.


Mason Jar Pin Cushion3

Then she inserted the prepared cushioned lid inside the ring.

Mason Jar Pin Cushion2

To make this a complete gift, she added a variety of embroidery floss, needles, buttons, beads and a small pair of scissors.

Mason Jar Pin Cushion

She secured the lid and wrap with a decorative ribbon. Then she added a simple gift tag (cut into the shape of a heart) with the matching sentiment.

 Mason Jar Pin Cushion Portrait

Super cute!

Thursday, January 24, 2013

1st Birthday Party Favors

Krissy at B-Inspired Mama threw her son J.C. an adorable and colorful birthday party to celebrate turning one.  She says she "kept it pretty simple" but by most people's standards, she went above & beyond.  Cute, right?


Krissy made some party favors for the little tots. She found these colorful dot bags at Target and used her "Oh Happy Day" stamp from PSA Essentials Peel & Stick stamps to dress up the bags.  To replicate, simply stamp the sentiment on white cardstock and punch out with your 1.5" circle cutter.  Frame against colorful cardstock punched out with your 2" circle cutter.  


Inside were fun little toys that she found on clearance at Target.  (Don't you just love that section?!) Head on over to Krissy's blog to see more adorable details of this party and don't miss the cute little guy himself eating his smash cake! 


Wednesday, January 23, 2013

Introducing Love Struck & A GIVEAWAY!

There are a few moments in time that last forever.  Sometimes you know it right in the moment, sometimes it's only upon reflection that you realize how special it was.  For me the weekend of Erin & Geoffrey Dunkle's wedding is something I will remember for the rest of my life and I knew it right away.  It was the weekend that Mike (now my husband) told me he loved me and asked me to move to South Carolina when I graduated The University of Michigan.  

Geoff and Mike were friends.  Erin and I had never met before their wedding but we connected immediately. I knew right away she was a stylish, fun, smart woman.  She liked my Prada bag and I am pretty sure I gave her the strangest wedding present of all time.  A Prada wallet.  Who does that? People who like Prada, I guess! 

I've kept up with Erin for the last ten years on Facebook, always admiring her beautiful children, her sassy and witty updates, and most of all her impeccable STYLE.    Since we both have children now, expensive brands like Prada are less of a priority but affordable style is still crucial!   Enter Love Struck, Erin's genius business. 


Love Struck is a virtual boutique on Facebook. Every Tuesday night, Erin holds an auction. She posts photos of the the items she is offering that week, and you (the customer) simply leave a comment that says 'sold!' when you see a product you want to buy. Pay via Paypal, and a few days later your purchase arrives in the mail.  It's as easy as that. 

Find beautiful necklaces, stunning scarves, earrings, bracelets, handbags, wallets, tablet covers, tops, dresses and more. Her products are so cute and so affordable ... perfect for busy moms (or anyone!) who want to look good every day but don't want to spend a fortune. 


To introduce you to Love Struck, today we're giving away a special treat from to one PSA Essentials fan or PSA Stamp Camp follower.   Do you love it!?  Enter below with Rafflecopter! You have until next Tuesday, 1/29 at 12:00 AM.  One winner will be chosen.  


a Rafflecopter giveaway

Be sure to check out this week's Love Struck auction, which starts at 6:30pm Central Time on Tuesday, too! 

Tuesday, January 22, 2013

Valentine's Day Giveaway!

Announcing our massive Valentine's Day giveaway! Enter now using our Rafflecopter widget at the end of this post now through February 4th to win: 
  • 1 custom stamp 
  • Mr. & Mrs. Peel & Stick stamps 
  • Love Birds Peel & Stick stamps 
  • 1 Alignment tool 
  • Holiday Red Ink 
  • Grapefruit pink Ink 
  • 2 boxes of note cards (winner's choice of two stampable styles!) 
  • Free shipping to the winner

$125 Retail value


Enter now by becoming our fan on Facebook!  Already a fan?  Let us know with a comment at the end of the post.   Be sure to share the love, too! 

a Rafflecopter giveaway

Friday, January 18, 2013

Let It Snow Decoration

I'm in Boston for the weekend with Molly and Connor for our annual winter trip!  We go in January every year to see friends and family from where I grew up, visit the children's museum or science museum (we don't have either here in Bluffton, SC!) and feel the winter weather (it's been 75 this week here.) These Boston temps look chilly.  My adapted South Carolina blood may not be able to handle these freezing temperatures. 


Ginger Bowie created a fun winter decoration for around the house for chilly temperatures this winter!  It's a "Let it Snow" block that you can display anywhere in the house that needs a little dressing up. 


Ginger has stamped Fancy Flakes Peel & Stick stamps on white paper, sealed them with Mod Podge so they hold up, and then adhered them to the block.  We love Fancy Flakes for winter!

What temperature is it where you live? 


Thursday, January 17, 2013

Saving for Vacation

Victoria Peak - Hong Hong 2000
Bangkok, Thailand 2000

When I was younger, I used to travel a lot with my family.  I'm fortunate enough to have been to Hong Hong, Thailand, Australia, New Zealand, Hawaii, the Caribbean, lots of the United States, Mexico,  Botswana, South Africa, Zimbabwe  Argentina, Chili, Brazil, Italy, France, England, Ireland, and a lot of other places in Europe.  If I could travel around the world on permanent vacation, I would.  There's nothing more amazing than discovering the culture of a foreign land, learning the history, exploring historical landmarks and eating the cuisine (my favorite part!)  I bluntly have to admit that none of these places were done on my own dime.  My parents loved to travel and I as their daughter, was the beneficiary to some truly once in a lifetime type of trips.  I am truly lucky and forever grateful. 

The harsh reality of being an adult is that vacations are expensive. We went to Disney World last August as a family of four for a long weekend and spent a small fortune.  Mike & I went to the Bahamas in August 2011 (just the two of us!)  and stayed at a Sandals All-Inclusive resort but nearly paid an arm for it. 


Now I just appreciate being on vacation more than ever! And I look forward to a trip unlike I used to.  We're saving up for our next family of four trip and I love this idea by Ginger Bowie.   She's taken a mason jar and and made it into a savings jar for vacation.   Insert a $20 here, a $5 there, and start saving!   Perhaps you'll want to save more if it looks cuter, so she dressed it up with her grapefruit pink ink and "vacation" stamp from PSA Mom's Calendar Peel & Stick stamps.  She added some pink polka dot ribbon, too. 


With a cute jar like this, surely you will want to save even faster, right? 


I know I will.  Looking forward to starting this at home.  Now...what where will we go?! 

Wednesday, January 16, 2013

Valentine's Day Cards

Time to get started on some Valentine's Day cards.  This is one holiday that I do make cards for friends and family.  Molly and I sit down and we cut out hearts, adorn them with stamps and stickers, and write messages to the recipient.  Then we send them off in the mail.  It's so much fun!  Our cards aren't quite as professional looking as these ones by our design team member Jennifer Ingle.  Aren't they pretty? 

This one uses our new Multi-holiday Peel & Stick pack.  The xo's & be mine are perfect for Valentine's Day! I love how Jennifer has used red and black ink here. 


I love two things about the card.  One are the rounded corners.  It's so "now" in card making and stationery. Then I love Jennifer's use of two different fonts - she's stamped the "i" from PSA Vanilla Peel & Stick pack and the "u" from PSA Archive Peel & Stick pack.   It makes the "u" more important, and I think that's special!


This one is just adorable.  I'd love to give it to Molly.  (She likes cupcakes!) Jennifer colored up the stamped girl from Smirk Many Moods by PSA Essentials.  The "Muah" is from our new sentiments collection!


Have you started to create Valentine's Day cards? We sure would love to see what you are working on! 


Tuesday, January 15, 2013

Potty Training Rewards System

I've heard of some kids being easy to potty train.  Parents just put their kids in underpants one day and the kid just "got it."  I haven't been as lucky with Molly.  She's been 6 weeks without an accident so we are on the right track, but I wish I had thought of something as creative as Jessica Hill did.  Check it out, it's a positive reward system designed to help with potty training.


She designed special "chips" (using her UBU Dress Up stamps by PSA Essentials) and her daughter accumulates chips and can "cash them in" for rewards.  We did the sticker chart.  This is way cooler.  Much more glamorous.  Molly would have eaten it up.  It's genius!

Head on over to Mad In Crafts blog for a full tutorial on how to create these chips and the box, too!

Monday, January 14, 2013

A mailbox full of cards


For my mom’s 60th birthday, I wanted to do something that incorporated her passion for photos and her love of family and friends.  So I sent 350 people a self-addressed, pre-stamped post card with a picture of my mom during sometime in her life.   I included instructions to write a birthday message, recall a favorite memory, or provide a quote and drop it in the mail between January 8 and January 10th.    Beginning on January 9th, my mom started receiving post cards.  The first day 15, next day 80, and the next day 65.  Hopefully if everyone sends them in, she'll get 350 post cards from family and friends wishing her happy birthday!

I enlisted the help of my aunt, uncle and grandfather to collect photos of my mom throughout her 60 years.  I scanned them at home, uploaded them individually to my favorite online web editor Pic Monkey.com and created birthday post cards.   


I did not create 350 individual post cards, I did them in batches of 10 and created 35 different cards. Picmonkey.com is a great site if you aren’t well versed in Photoshop.  You can add comic bubbles, labels, tags, write messages, and do different photo effects.  Most of it is free infact, everything I did was free on it.  Here are a few of my favorite post cards I created:    


If you are interested in replicating this project, here are a few tips for the post cards:

·         Scan the photo at high res (300 dpi or higher)
·         Edit the photo for size in Picassa.  You can set the size in Picassa and name it “post card” of 4.25 x 6.  This ensures you have it correct and when you create the post card, any writing doesn’t get cut off!
·         Upload and edit in PicMonkey, then when you are finished save them all to a folder that you can then upload in a batch.
·         Upload all of them as an album at Snapfish.com. 
·         Turn the photos into post cards using this product of theirs: http://www.snapfish.com/snapfish/photo-gifts/product/photo-to-postcard


The most difficult and least fun part of this project is the grunt work labeling, stuffing, and stamping. This was hours and hours of work.  I used Avery Ink Jet Easy Peel Labels (model #5160) which come in sheets of 30 to print off sheets of her address for the self-addressed part.   I also used these labels for her address book, which I got her to send me a few months ago.   My father and I worked as a team here – I started off by peeling the labels off I knew I wanted to send the cards to, and then he checked off which other ones I should send to that I didn’t know.  Her address book had over 550 names!    He’s a very thorough person and came over a few times to help sort through all the names.   Since we were sending to so many people, it was also difficult to keep track of addresses that had changed or people had moved.  I recommend making sure your address book is completely up-to-date before you start labeling…


Molly was always interested in "helping" me with this project (though I never told her what it was because she is really terrible at keeping a surprise!)


When everything was all sealed up, I stamped my return address on all 350 letters with my PSA Essentials personalized stamp.  This is way cuter than the Avery labels!  I used my outer ring address and for the inner ring I chose a cupcake from PSA Whimsy Cake Peel & Stick pack.   I had a hard time choosing from our 22-inks but ultimately went with royal blue.


I also had a custom stamp made that said “60th Birthday Surprise – Time Sensitive Material – Response Requested ASAP.” I stamped this on the back of each of the envelopes to make it extra special and alert people to the surprise and that they needed to do something in a timely manner. 


The letters were mailed on January 1st and arrived to in-state people on January 2nd.  Out-of-state people received them between the 3rd and the 5th.   My father and I really labored over this decision.  Send them too soon and people forget about it and the post card (already postage paid!) gets lost on their desk.  Send them with not enough time and they don’t have enough time to write their note and send it back.   We decided that a week before their “due date” was sufficient.

We want to get an album for my mom so she can store all of the post cards and read them like a book.  I've been eyeing the Savannah Extra Capacity Album album personalized: “Post cards to Cynny on her 60th Birthday" on Exposuresonline.com.  With this album, you also need to purchase the individual pages (they’re sold separately.)  We're waiting for a good coupon, they generally have a one day only sale with 25% off. This seems like an optional part of the project and something you could eliminate to cut costs but think it will help preserve the post cards.  

The postage is really the most expensive part of this, and certainly you don’t have to send to 350 people.  I do think that including the pre-stamped card helps your return rate – not because people will gripe about the cost of a postage stamp (.32 cents each) but because people don’t usually have them on hand and they may be lazy getting them at the post office. 

Her reaction to the surprise was priceless.  She was thrilled.  She's been calling or texting me with thank you's abundant and I know she really appreciates it.    That was worth all the time and effort! What a fun project.  Happy 60th birthday, Mom!